Getting started with koa2

https://www.bilibili.com/video/BV18h411H7GE?spm_id_from=333.999.0.0

Node+koa2 build API service

Tutorial source:https://www.bilibili.com/video/BV13A411w79h?spm_id_from=333.999.0.0

Initialization

  • npm init -y
  • git init,create a new .gitignore file,and add node_modules
    • After submitting the version, view the records through git log
  • Create a new readme.md document

Project initialization

  • npm i koa

  • Create newsrc/main.js file in rootdirectory

    1
    2
    3
    4
    5
    6
    7
    8
    9
    10
    11
    const Koa = require('koa') // import koa, the exported class is generally capitalized

    const app = new Koa() // instantiation

    app.use((ctx, next) => { // middleware
    ctx.body = 'hello world' // test code
    })

    app.listen(3000, () => { // run server
    console.log('server is running on http://localhost:3000 !');
    })
  • Start development service:

    • node .\src\main.js: Node mode start, is resident memory, not hot loaded

Development optimization

Automatic restart service

  • npm i nodemon

  • Configure dev script: if nodemon is installed globally, then npx is not required

    package.json

    1
    2
    3
    4
    5
    6
    7
    8
    9
    10
    11
    12
    13
    14
    15
    16
    17
    18
    {
    "name": "01",
    "version": "1.0.0",
    "description": "",
    "main": "index.js",
    "scripts": {
    "test": "echo \"Error: no test specified\" && exit 1",
    "dev": "npx nodemon ./src/main.js"
    },
    "keywords": [],
    "author": "",
    "license": "ISC",
    "dependencies": {
    "koa": "^2.13.4",
    "nodemon": "^2.0.19"
    }
    }

  • npm run dev run server

    1
    2
    3
    4
    5
    6
    7
    8
    9
    10
    11
    PS D:\workspace\github\code\project-workshop\code-prac\koa\01> npm run dev

    > 01@1.0.0 dev
    > npx nodemon ./src/main.js

    [nodemon] 2.0.19
    [nodemon] to restart at any time, enter `rs`
    [nodemon] watching path(s): *.*
    [nodemon] watching extensions: js,mjs,json // Listen to these three files
    [nodemon] starting `node ./src/main.js` // Start with node
    server is running on http://localhost:3000 ! // Print out content

Read configuration file

  • Install dotenv (you can check the introduction on the NPM official website):load the configuration file of .Env in the root directory, and load the key value pair into the environment variable of process.env

    • npm i dotenv

    • 项目根目录,新建.env配置文件并添加配置

      .env

      1
      APP_PORT = 8000
  • 读取配置

    • 新建src/config/config.default.js

      1
      2
      3
      require('dotenv').config() // 导入dotenv,调用config方法,读取配置并写入到`process.env`中

      module.export = process.env
    • 改写main.js,使用解构赋值的方式,获取到APP_PORT的配置

      1
      2
      3
      4
      5
      6
      7
      8
      9
      10
      11
      const Koa = require('koa')
      const {APP_PORT} = require('./config/config.default') // 导入process.env环境变量中的APP_PORT字段
      const app = new Koa()

      app.use((ctx, next) => {
      ctx.body = 'hello world'
      })

      app.listen(APP_PORT, () => {
      console.log(`server is running on http://localhost:${APP_PORT} !`); // 使用模板字符串
      })
    • 启动开发服务

添加路由

所谓的api,就是根据不同url返回不同的数据

目前http://localhost:8000http://localhost:8000/users返回的内容都是一样的

需要使用路由,来根据不同的url,调用不同的处理函数

安装koa-router

官网案例:

1
2
3
4
5
6
7
8
9
10
11
12
13
const Koa = require('koa');
const Router = require('@koa/router'); // 1.导入Router

const app = new Koa();
const router = new Router(); // 2.新建router实例对象

router.get('/', (ctx, next) => { // 3.编写路由
// ctx.router available
});

app // 4.注册中间件
.use(router.routes()) // use方法只能接受函数作为参数,通过router.routes()方法返回一个函数给中间件处理
.use(router.allowedMethods());

配置多个路由

1
2
3
4
5
6
7
8
9
10
11
12
13
14
15
16
17
18
19
20
21
22
23
24
25
26
27
28
const Koa = require('koa') // 导入Koa,由于导出的是类,一般大写
const Router = require('@koa/router') // 导入router

const {APP_PORT} = require('./config/config.default')
const app = new Koa() // 实例化


// app.use((ctx, next) => { // 中间件
// ctx.body = 'hello world' // 测试代码
// })

const indexRouter = new Router()
indexRouter.get('/', (ctx, next) => {
ctx.body = 'hello world'
})

const userRouter = new Router()
userRouter.get('/user', (ctx, next) => {
ctx.body = 'user'
})


app.use(indexRouter.routes())
app.use(userRouter.routes())

app.listen(APP_PORT, () => { // 开启服务
console.log(`server is running on http://localhost:${APP_PORT} !`);
})

但是代码都写在一起肯定不行,需要拆分一下路由

新建src/router文件夹

新建user.routes.js

1
2
3
4
5
6
7
8
9
10
const Router = require('@koa/router')
const router = new Router({prefix: '/user'})


router.get('/', (ctx, next) => {
ctx.body = 'user'
})

module.exports = router

修改main.js

1
2
3
4
5
6
7
8
9
10
11
12
13
14
15
16
17
18
19
const Koa = require('koa') // 导入Koa,由于导出的是类,一般大写
const Router = require('@koa/router') // 导入router

const {APP_PORT} = require('./config/config.default')
const app = new Koa() // 实例化
const userRouter = require('./router/user.route')

const indexRouter = new Router()
indexRouter.get('/', (ctx, next) => {
ctx.body = 'hello world'
})

app.use(indexRouter.routes()) // 后续这里也会继续优化,不然当路由很多时,写法也会很恶心
app.use(userRouter.routes())

app.listen(APP_PORT, () => { // 开启服务
console.log(`server is running on http://localhost:${APP_PORT} !`);
})

目录结构优化

拆分http服务和业务代码

我们在main.js里面写了太多的功能

  • 拆分http服务与业务相关代码

    • 新建src/app/index.js,专门放业务代码
    1
    2
    3
    4
    5
    6
    7
    8
    9
    10
    11
    12
    13
    14
    15
    16
    const Koa = require('koa') // 导入Koa,由于导出的是类,一般大写
    const Router = require('@koa/router') // 导入router

    const userRouter = require('../router/user.route')

    const app = new Koa() // 实例化
    const indexRouter = new Router()
    indexRouter.get('/', (ctx, next) => {
    ctx.body = 'hello world'
    })

    app.use(indexRouter.routes())
    app.use(userRouter.routes())

    module.exports = app

    修改man.js

    1
    2
    3
    4
    5
    6
    7
    8
    9
    const {APP_PORT} = require('./config/config.default')

    const app = require('./app')

    app.listen(APP_PORT, () => { // 开启服务
    console.log(`server is running on http://localhost:${APP_PORT} !`);
    })


抽离控制层

将路由router中的处理函数,单独抽离成控制层controller

  • 新建src/controller文件夹

  • 新建user.controller.js

    1
    2
    3
    4
    5
    6
    7
    class UserController{
    async register(ctx, next) {
    ctx.body = '用户注册成功'
    }
    }

    module.exports = new UserController()

    修改router/user.route.js

    1
    2
    3
    4
    5
    6
    7
    8
    9
    const Router = require('@koa/router')
    const router = new Router({prefix: '/user'})
    const {register} = require('../controller/user.conroller')

    // 注册接口
    router.post('/register', register)

    module.exports = router

  • 测试接口

    这里我们写成了post请求,使用postman或者是Apifox(国内的)来测试post请求

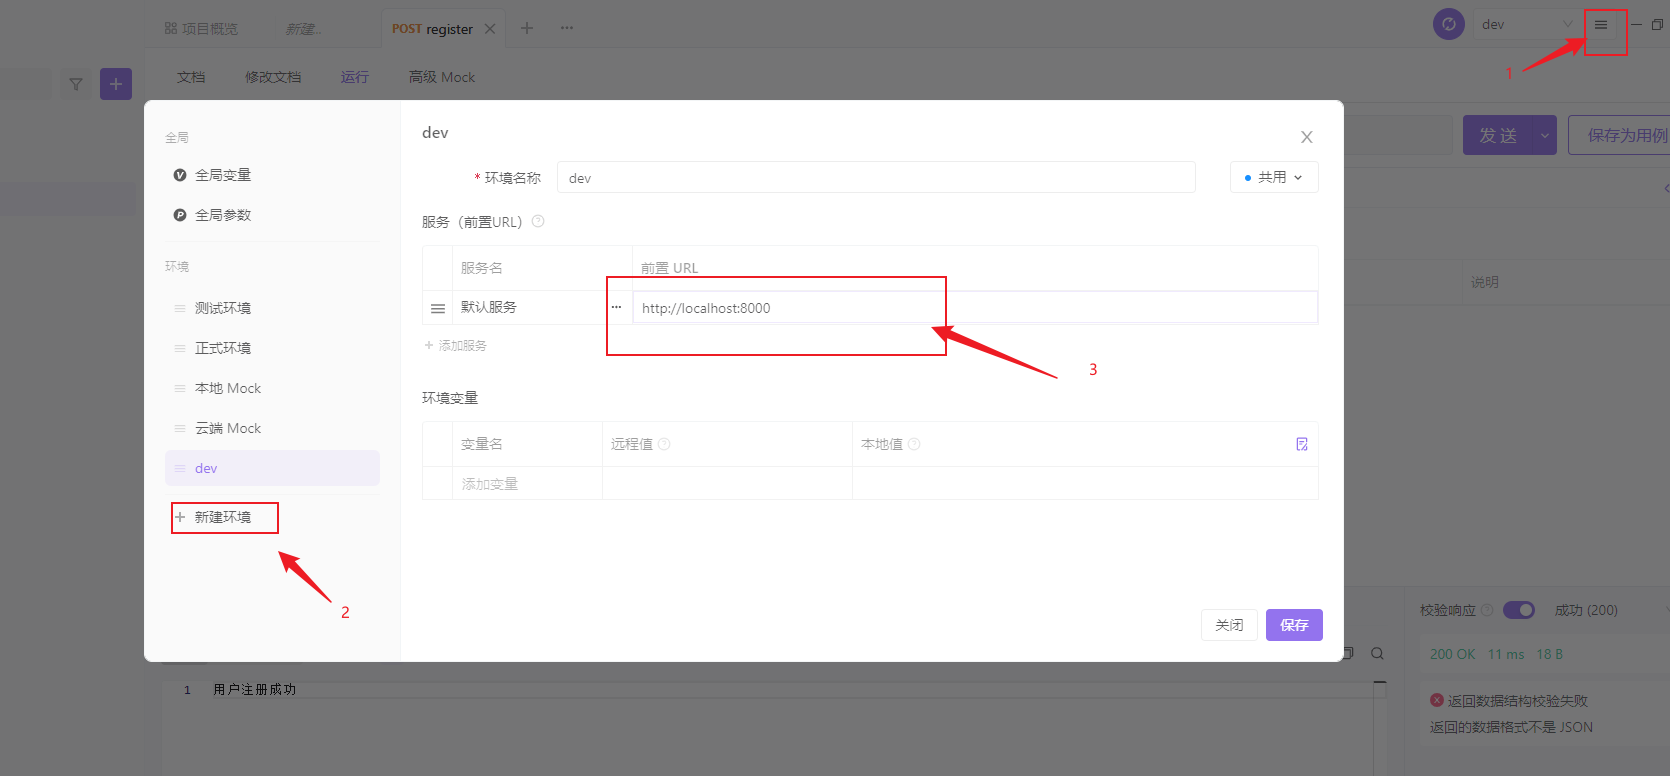
    这里以apifox为例,下载后,新建项目 > 新建接口

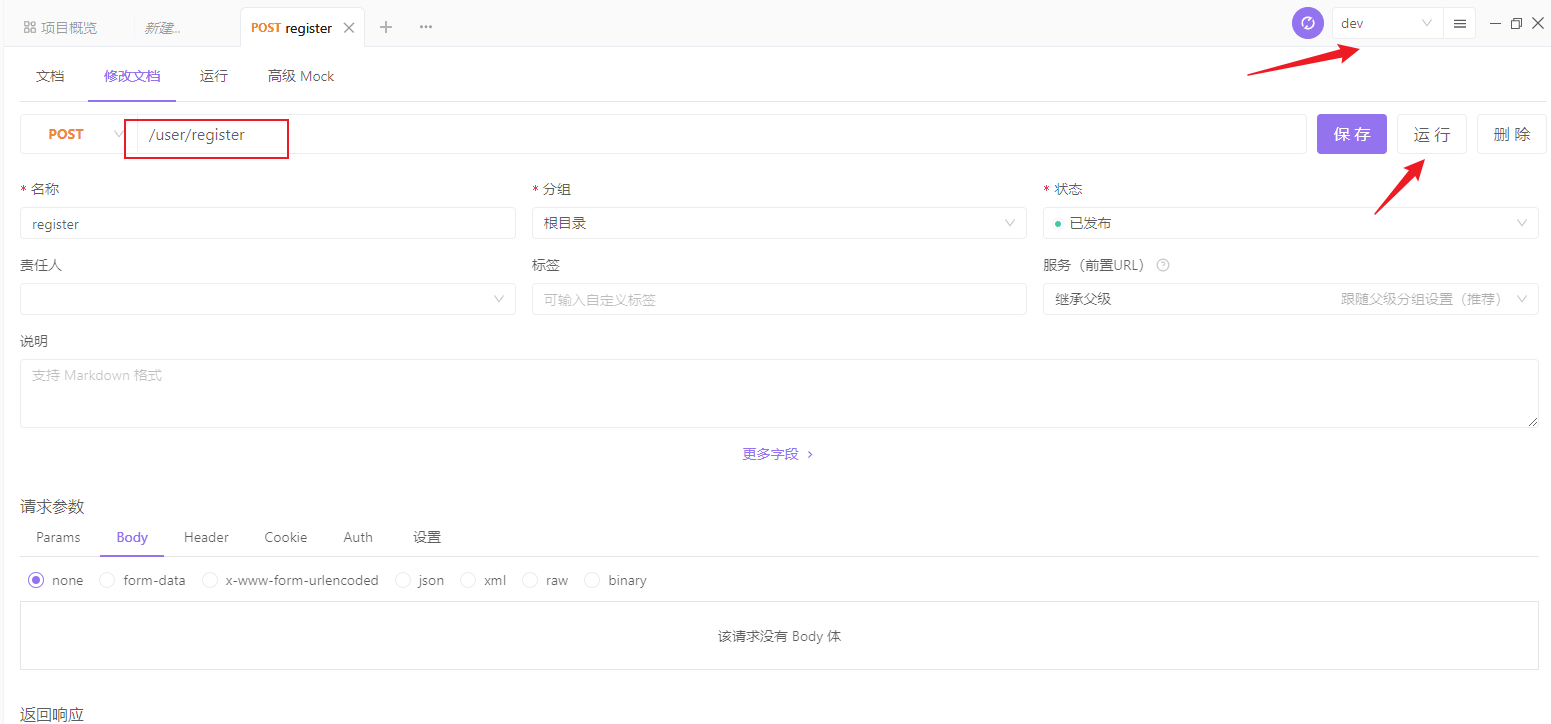
    按图示配置

    image-20220725220620161

    image-20220725220748784

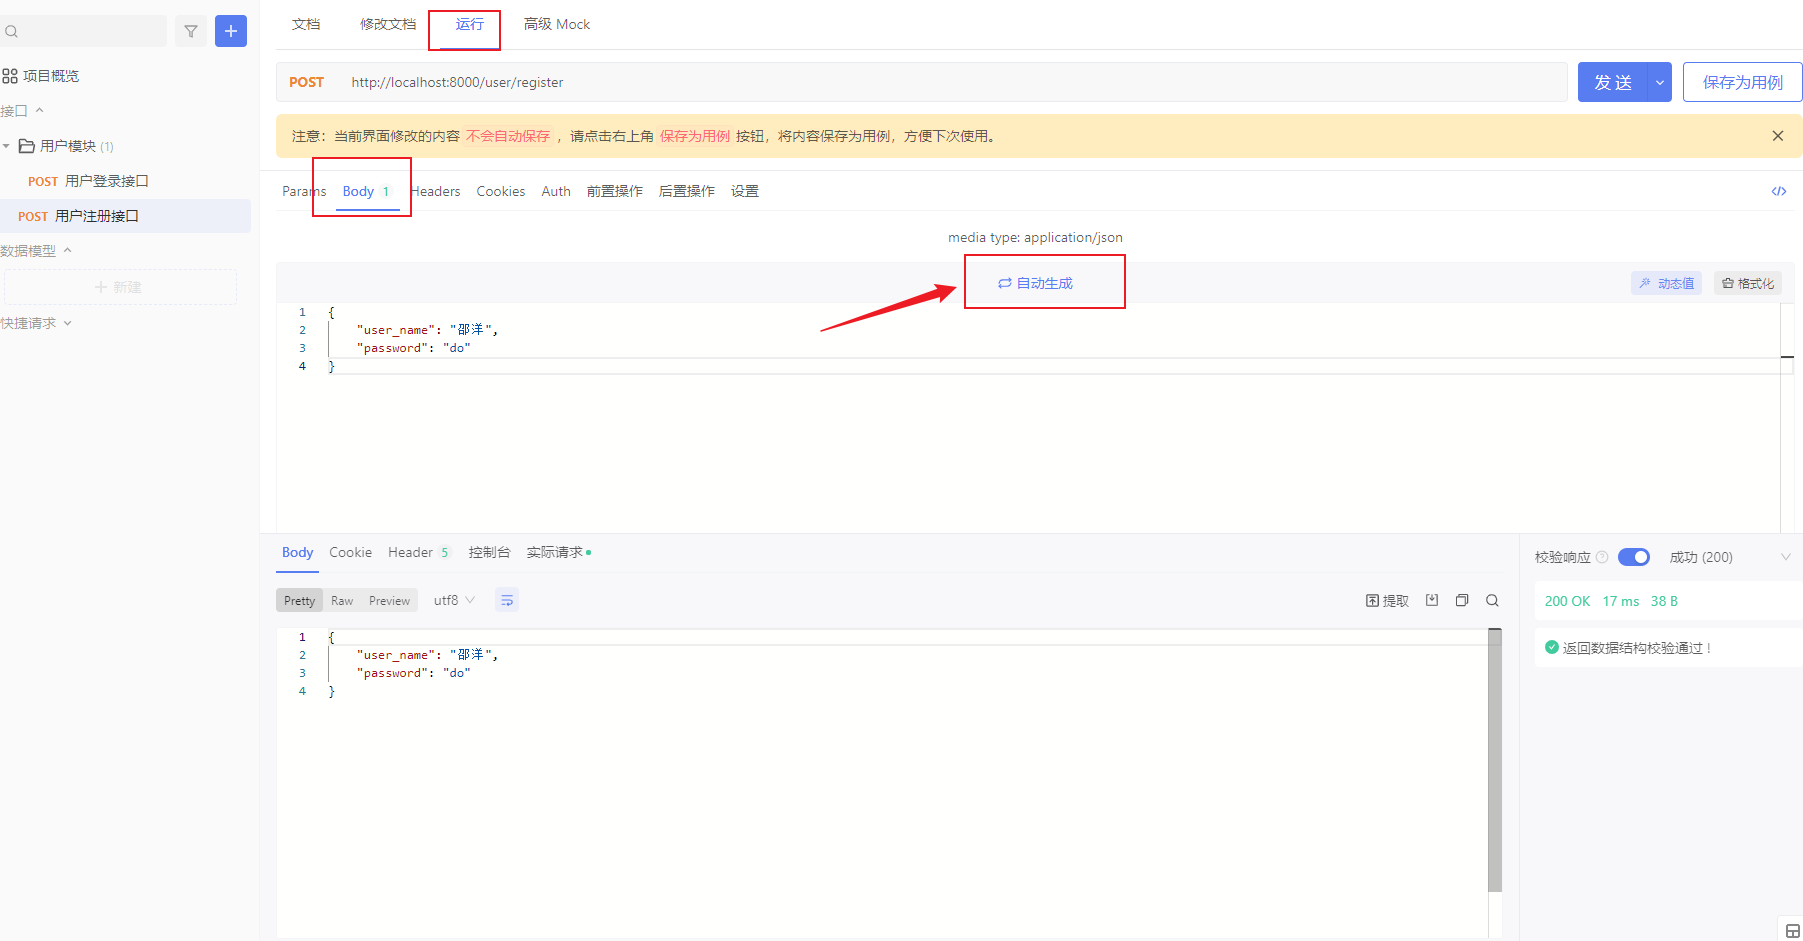
    配置好路由后,点击运行,可以拿到数据了:

    image-20220725220846437

  • 我们再写一个登录的接口

    user.router.js

    1
    2
    3
    4
    5
    6
    7
    8
    9
    10
    11
    12
    const Router = require('@koa/router')
    const router = new Router({prefix: '/user'})
    const {register, login} = require('../controller/user.conroller')

    // 注册接口
    router.post('/register', register)
    // 登录接口
    router.post('/login', login)


    module.exports = router

    user.controller.js

    1
    2
    3
    4
    5
    6
    7
    8
    9
    10
    11
    class UserController{
    async register(ctx, next) {
    ctx.body = '用户注册成功'
    }

    async login(ctx, next) {
    ctx.body = '用户登录成功'
    }
    }

    module.exports = new UserController()

解析body、拆分service

解析body

完整的注册接口

1
POST /user/register

请求参数

1
user_name, password

响应

成功:

1
2
3
4
5
6
7
8
{
"code": 0,
"message": "用户注册成功",
"result": {
id: 2,
"user_name": "user"
}
}

原型图:

image-20220725222952833

koa需要借助中间件,来解析参数

  • koa-bodyhttps://www.npmjs.com/package/koa-body

    1
    A full-featured koa body parser middleware. Supports multipart, urlencoded, and json request bodies. Provides the same functionality as Express's bodyParser - multer.

    官方基础样例:

    1
    2
    3
    4
    5
    6
    7
    8
    9
    10
    11
    const Koa = require('koa');
    const koaBody = require('koa-body'); // 1.引入中间件

    const app = new Koa();

    app.use(koaBody()); // 在所有请求之前,注册这个中间件,就把所有的内容写到了ctx.request.body里面
    app.use(ctx => {
    ctx.body = `Request Body: ${JSON.stringify(ctx.request.body)}`; // 3.看下request.body
    });

    app.listen(3000);
    • 更推荐,相比较于koa-bodyparser,还支持文件上传
  • koa-bodyparser

将之前apifox的注册接口完善下,由于是post请求,我们在body里面,设置参数
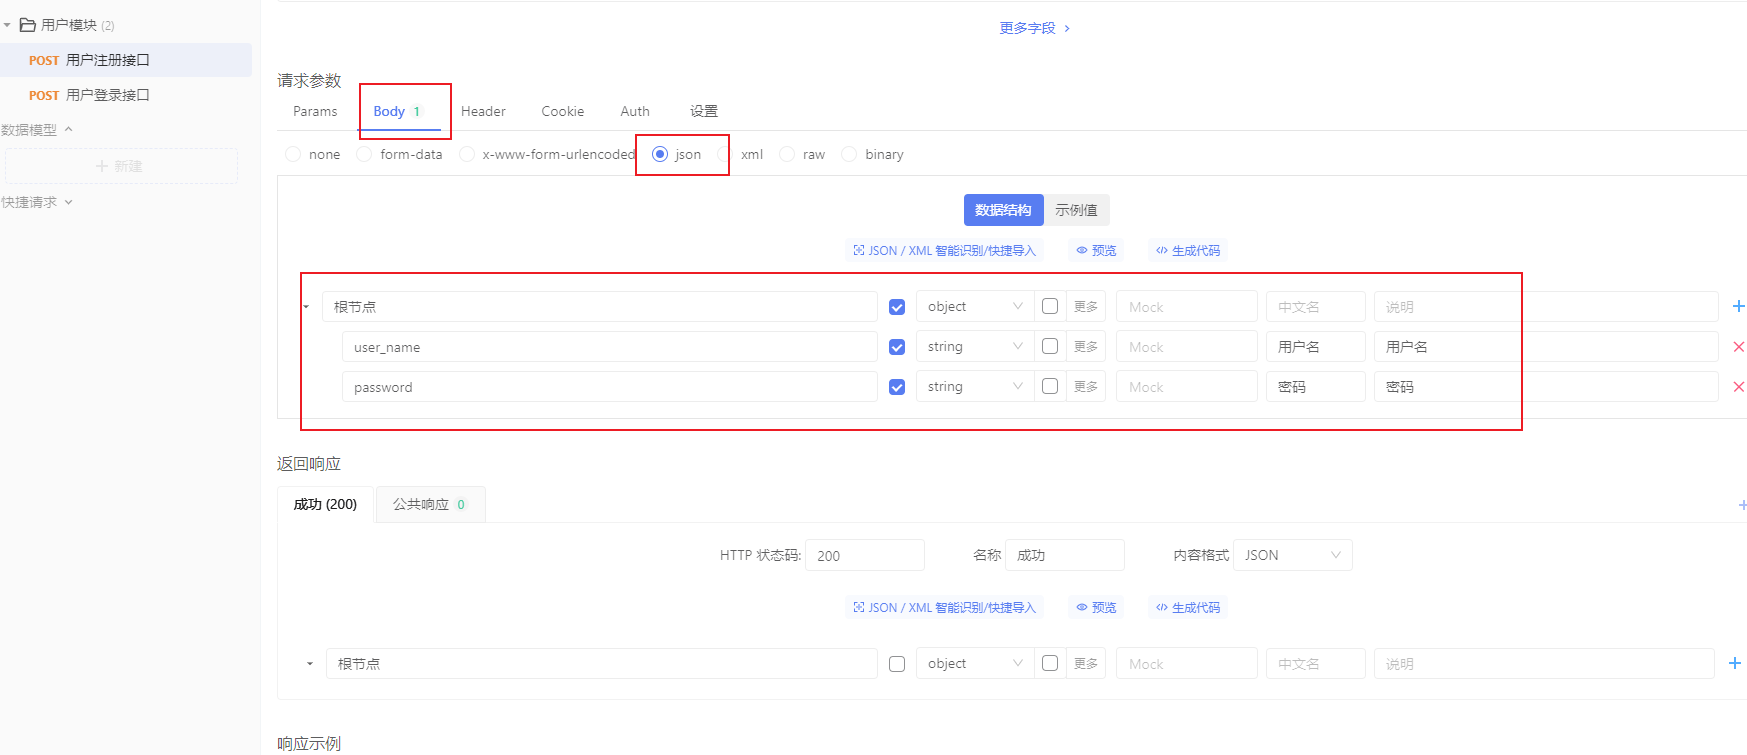
image-20220725225232579

安装koa-body

1
npm i koa-body

补充,将nodemon安装到开发时依赖,先卸载:npm uninstall nodemon,再重新安装到开发依赖:npm i nodemon -D

app/index.js中添加koa-body相关代码

app/index.js

1
2
3
4
5
6
7
8
9
10
11
12
13
14
15
16
17
18
const Koa = require('koa')
const Router = require('@koa/router')
const koaBody = require('koa-body') // 1.导入koa-body
const userRouter = require('../router/user.route')

const app = new Koa()
app.use(koaBody()) // 2.在所有中间件之前,注册koa-body

const indexRouter = new Router()
indexRouter.get('/', (ctx, next) => {
ctx.body = `Request Body: ${JSON.stringify(ctx.request.body)}`
})

app.use(indexRouter.routes())
app.use(userRouter.routes())

module.exports = app

控制层(处理函数)user.config.js

1
2
3
4
5
6
7
8
9
10
11
12
class UserController{
async register(ctx, next) {
console.log(ctx.request.body)
ctx.body = ctx.request.body // 我的理解:把请求的参数,放在响应的body里面,再返给客户端
}

async login(ctx, next) {
ctx.body = '用户登录成功'
}
}

module.exports = new UserController()

回到apifox中,我们生成下body请求体,发送下注册的请求

image-20220725230641092

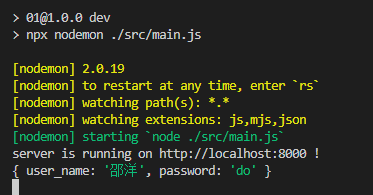
后台也打印结果了

image-20220725230741773

控制器里一般做这些事

  • 1.获取数据
  • 2.操作数据库
    • 如果操作数据库的逻辑很复杂,也会单独抽出这一部分(service层)
  • 3.返回结果

抽取servcie

和数据库相关的,根据客户端传递的不同参数,来操作数据库

新建src/service目录

新建user.service.js

1
2
3
4
5
6
7
8
9
10
11
class UserService {
// 主要用来操作数据库
// 处理函数对应数据库的操作,就是增删改查
// 注册,就是往数据库里,增加一条记录
async createUser(user_name, password) { // 当参数超过三个时,建议用一个对象
//@TODO: 写入数据库
return '写入数据库成功'
}
}

module.exports = new UserService()

修改user.controller.js

1
2
3
4
5
6
7
8
9
10
11
12
13
14
15
16
17
18
19
20
const {createUser} = require('../service/user.service')

class UserController{
async register(ctx, next) {
// 1. 获取数据
// console.log(ctx.request.body)
const {user_name, password} = ctx.request.body
// 2.操作数据库
const res = await createUser(user_name, password)

// 3.返回结果
ctx.body = ctx.request.body // 我的理解:把请求的参数,放在响应的body里面,再返给客户端
}

async login(ctx, next) {
ctx.body = '用户登录成功'
}
}

module.exports = new UserController()

后台打印结果:

image-20220725232505667

ORM工具集成

sequelize介绍

ORM:对象关系映射

  • 数据表映射(对应)一个类
  • 数据表中的数据行(记录)对应一个对象
  • 数据表字段对应对象的属性
  • 数据表的操作,对应对象的方法
  • 就是使用面向对象的方式,来操作数据库

使用sequelize ORM数据库工具:https://github.com/demopark/sequelize-docs-Zh-CN/tree/master

  • 基于PromiseORM工具

  • Sequelize 是一个基于 promiseNode.js ORM 工具, 目前支持 Postgres, MySQL, MariaDB, SQLite 以及 Microsoft SQL Server, Amazon Redshift 和 Snowflake’s Data Cloud. 它具有强大的事务支持, 关联关系, 预读和延迟加载,读取复制等功能.

  • 安装sequelizemysql2(支持Promise

    1
    npm i sequelize mysql2

    得注意下安装的sequelize支持的最低版本的mysql,目前默认安装的sequlize版本是6.21.3,对应的mysql版本至少是5.7及以上:https://github.com/demopark/sequelize-docs-Zh-CN/tree/v6
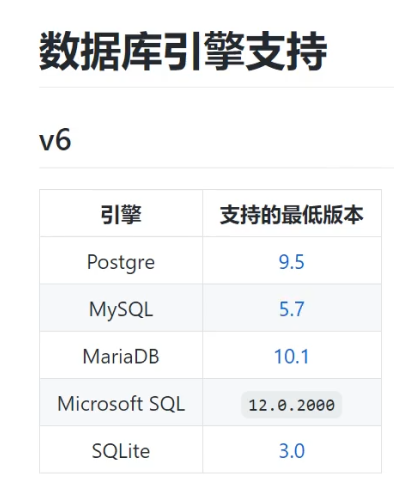
    image-20220726064512073

安装数据库

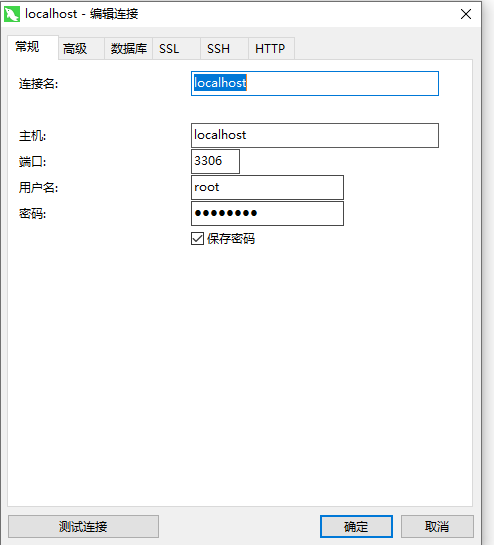
在正式连接之前,我们需要装下mysql数据库,这里暂时安装windows版本,参照:https://blog.csdn.net/jsugs/article/details/124143762

启动mysql服务

1
输入net start mysql或sc start mysql

image-20220726070015186

改密码后再用navicat连接,会报错Authentication plugin 'caching_sha2_password' cannot be loaded,参照:https://www.jianshu.com/p/465a444ad846

1
2
3
ALTER USER 'root'@'localhost' IDENTIFIED BY '123123' PASSWORD EXPIRE NEVER;   #修改加密规则 
ALTER USER 'root'@'localhost' IDENTIFIED WITH mysql_native_password BY '123123'; #更新一下用户的密码
FLUSH PRIVILEGES; #刷新权限

image-20220726071528438

查询mysql进程,并杀掉

1
2
3
netstat -aon|findstr "3306"

taskkill /pid 26372 -t -f

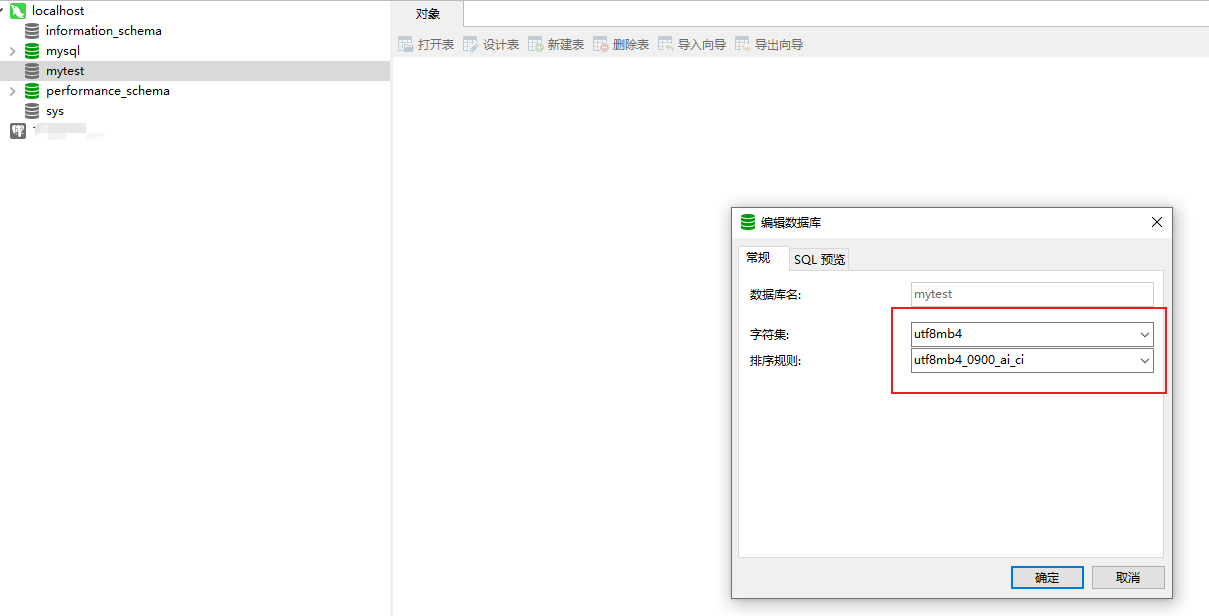
成功进入后,新建数据库

一开始是没有选中下面两个的,设置名称后直接确定

image-20220726071755569

连接数据库

官方示例:https://github.com/demopark/sequelize-docs-Zh-CN/blob/v6/core-concepts/getting-started.md

1
2
3
4
5
6
7
8
9
10
11
12
13
14
15
16
17
const { Sequelize } = require('sequelize');

// 方法 1: 传递一个连接 URI
const sequelize = new Sequelize('sqlite::memory:') // Sqlite 示例
const sequelize = new Sequelize('postgres://user:pass@example.com:5432/dbname') // Postgres 示例

// 方法 2: 分别传递参数 (sqlite)
const sequelize = new Sequelize({
dialect: 'sqlite',
storage: 'path/to/database.sqlite'
});

// 方法 3: 分别传递参数 (其它数据库)
const sequelize = new Sequelize('database', 'username', 'password', {
host: 'localhost',
dialect: /* 选择 'mysql' | 'mariadb' | 'postgres' | 'mssql' 其一 */
});

新建src/db/seq.js

该文件中实现数据库的连接,并导出

1
2
3
4
5
6
7
8
9
10
11
12
13
14
15
const {Sequelize} = require('sequelize')

const seq = new Sequelize('mytest', 'root', '123123', {
host: 'localhost',
dialect: 'mysql'
})


seq.authenticate().then(res => {
console.log('数据库连接成功', res)
}).catch(error => {
console.log('数据库连接失败', error)
})

module.exports = seq

db目录下,使用node测试下:

image-20220726200218491

开发环境我们这样搞没事,生产环境可能会用连接池

配置文件

使用dotenv将参数提取成配置文件

修改.env

1
2
3
4
5
6
7
APP_PORT = 8000

MYSQL_HOST = localhost
MYSQL_PORT = 3306
MYSQL_USER = root
MYSQL_PASSWORD = 123123
MYSQL_DATABASE = mytest

seq.js中导入并使用

1
2
3
4
5
6
7
8
9
10
11
12
13
14
15
16
17
18
19
20
21
22
23
const { Sequelize } = require('sequelize')
const {
MYSQL_HOST,
MYSQL_PORT,
MYSQL_USER,
MYSQL_PASSWORD,
MYSQL_DATABASE
} = require('../config/config.default')

console.log(MYSQL_HOST,MYSQL_DATABASE)
const seq = new Sequelize(MYSQL_DATABASE, MYSQL_USER, MYSQL_PASSWORD, {
host: MYSQL_HOST,
dialect: 'mysql',
})


// seq.authenticate().then(res => {
// console.log('数据库连接成功', res)
// }).catch(error => {
// console.log('数据库连接失败', error)
// })

module.exports = seq

此时需要在根目录下测试,不然读不到.env文件

image-20220726201817869

测试完将测试代码注释掉

创建User模型

模型创建

新建src/model文件夹

service层通过model层来具体操作数据库

新建user.model.js,使用define方法来创建模型:https://www.sequelize.com.cn/core-concepts/model-basics#%E4%BD%BF%E7%94%A8-sequelizedefine

全局定义表名等于模型名,seq.js

1
2
3
4
5
6
7
8
9
10
11
12
13
14
15
16
17
18
19
const { Sequelize } = require('sequelize')
const {
MYSQL_HOST,
MYSQL_PORT,
MYSQL_USER,
MYSQL_PASSWORD,
MYSQL_DATABASE
} = require('../config/config.default')

console.log(MYSQL_HOST,MYSQL_DATABASE)
const seq = new Sequelize(MYSQL_DATABASE, MYSQL_USER, MYSQL_PASSWORD, {
host: MYSQL_HOST,
dialect: 'mysql',
define: {
freezeTableName: true // 全局定义表明等于模型名
}
})

module.exports = seq

根据表设计文档,定义模型属性:

用户表

表名:sai_users

字段名 字段类型 说明
id int 主键,自增(sequelize会自动维护)
user_name varchar(255) 用户名,unique
password char(64) 密码
is_admin tinyint(1) 0:不是管理员,1:是管理员

定义模型属性时的数据类型,参见:https://www.sequelize.com.cn/core-concepts/model-basics#%E6%95%B0%E6%8D%AE%E7%B1%BB%E5%9E%8B

user.model.js

1
2
3
4
5
6
7
8
9
10
11
12
13
14
15
16
17
18
19
20
21
22
23
24
25
26
27
28
29
30
const { DataTypes } = require("sequelize") // 不要相信vscode的自动导入,坑!!

const seq = require('../db/seq')

// 创建模型
const User = seq.define('sai_user', {
// id会被sequelize自动创建

// user_name
user_name: {
type: DataTypes.STRING,
allowNull: false, // 不允许为空
unique: true,
comment: '用户名唯一' // 注释
},
// password
password: {
type: DataTypes.CHAR(64),
allowNull: false,
comment: '密码'
},
is_admin: {
type: DataTypes.BOOLEAN,
allowNull: false,
defaultValue: 0,
comment: '是否为管理员,0:不是管理员(默认值),1:是管理员'
}
})

User.sync({force: true})

有关模型同步:https://www.sequelize.com.cn/core-concepts/model-basics#%E6%A8%A1%E5%9E%8B%E5%90%8C%E6%AD%A5

根目录下,执行node src/model/user.model.js

就是执行了sql语句

1
2
3
4
5
6
PS D:\workspace\github\code\project-workshop\code-prac\koa\01> node .\src\model\user.model.js
localhost mytest
Executing (default): DROP TABLE IF EXISTS `sai_user`;
Executing (default): CREATE TABLE IF NOT EXISTS `sai_user` (`id` INTEGER NOT NULL auto_increment , `user_name` VARCHAR(255) NOT NULL UNIQUE COMMENT '用户名唯一', `password` CHAR(64) NOT NULL COMMENT '
密码', `is_admin` TINYINT(1) NOT NULL DEFAULT 0 COMMENT '是否为管理员,0:不是管理员(默认值),1:是管理员', `createdAt` DATETIME NOT NULL, `updatedAt` DATETIME NOT NULL, PRIMARY KEY (`id`)) ENGINE=InnoDB;
Executing (default): SHOW INDEX FROM `sai_user`

可以看到,数据库中多了一个表:

image-20220726211457412

image-20220726211857584

其中,createAtupdatedAtsequelize自动给我们维护的,如果不需要时间戳,在define函数中,添加配置项:{timestamps: false},但是一般情况下,都是保留的

导出User模型,并注释掉sync的代码

1
2
3
4
5
6
7
8
9
10
11
12
13
14
15
16
17
18
19
20
21
22
23
24
25
26
27
28
29
30
31
const { DataTypes } = require("sequelize")

const seq = require('../db/seq')

// 创建模型
const User = seq.define('sai_user', {
// id会被sequelize自动创建

// user_name
user_name: {
type: DataTypes.STRING,
allowNull: false, // 不允许为空
unique: true,
comment: '用户名唯一' // 注释
},
// password
password: {
type: DataTypes.CHAR(64),
allowNull: false,
comment: '密码'
},
is_admin: {
type: DataTypes.BOOLEAN,
allowNull: false,
defaultValue: 0,
comment: '是否为管理员,0:不是管理员(默认值),1:是管理员'
}
})

// User.sync({force: true}) // 强制同步数据库(创建数据表)
module.exports = User

添加用户

我们继续完善写入数据库的代码

需要通过ORM实现标准的CRUDhttps://www.sequelize.com.cn/core-concepts/model-querying-basics

user.service.js

1
2
3
4
5
6
7
8
9
10
11
12
13
14
15
16
17
18
19
20
const User = require('../model/user.model')

class UserService {
// 主要用来操作数据库
// 处理函数对应数据库的操作,就是增删改查
// 注册,就是往数据库里,增加一条记录
async createUser(user_name, password) { // 当参数超过三个时,建议用一个对象
//@TODO: 写入数据库
// 插入数据
const res = await User.create({
user_name,
password
})
console.log(res)

return res
}
}

module.exports = new UserService()

使用apifox发送register接口,成功后查看数据库

image-20220726231148358

image-20220726231243724

成功注册,注意下时区慢8小时

再看下后台打印:

执行的了insert语句

User.create返回的是一个sai_user的表模型对象,dataValues对应着表里面的一条记录

1
2
3
4
5
6
7
8
9
10
11
12
13
14
15
16
17
18
19
20
21
22
23
24
25
26
27
28
29
30
31
Executing (default): INSERT INTO `sai_user` (`id`,`user_name`,`password`,`is_admin`,`createdAt`,`updatedAt`) VALUES (DEFAULT,?,?,?,?,?);
sai_user {
dataValues: {
is_admin: false,
id: 1,
user_name: '邵洋',
password: 'do',
updatedAt: 2022-07-26T15:08:52.849Z,
createdAt: 2022-07-26T15:08:52.849Z
},
_previousDataValues: {
user_name: '邵洋',
password: 'do',
id: 1,
is_admin: false,
createdAt: 2022-07-26T15:08:52.849Z,
updatedAt: 2022-07-26T15:08:52.849Z
},
uniqno: 1,
_changed: Set(0) {},
_options: {
isNewRecord: true,
_schema: null,
_schemaDelimiter: '',
attributes: undefined,
include: undefined,
raw: undefined,
silent: undefined
},
isNewRecord: false
}

我们要返回给用户dataValues的结果

对于其他的值,在service层就可以直接过滤掉,直接返回res.dataValues

user.service.js

1
2
3
4
5
6
7
8
9
10
11
12
13
14
15
const User = require('../model/user.model')
class UserService {
// 主要用来操作数据库
// 处理函数对应数据库的操作,就是增删改查
// 注册,就是往数据库里,增加一条记录
async createUser(user_name, password) { // 当参数超过三个时,建议用一个对象
//@TODO: 写入数据库
// 插入数据
const res = await User.create({ user_name, password })

return res.dataValues
}
}

module.exports = new UserService()

那么controller层拿到返回的数据后,再根据接口文档,构建最终要返回给客户端的数据格式

注册接口:

成功

1
2
3
4
5
6
7
8
{
"code": 0,
"message": "用户注册成功",
"result": {
"id": 2,
"user_name": "user"
}
}

失败

1
2
3
4
5
{
"code": "10001",
"message": "用户名或密码不能为空",
"result": ""
}

修改控制层

user.controller.js

1
2
3
4
5
6
7
8
9
10
11
12
13
14
15
16
17
18
19
20
21
22
23
24
25
26
27
const {createUser} = require('../service/user.service')

class UserController{
async register(ctx, next) {
// 1. 获取数据
// console.log(ctx.request.body)
const {user_name, password} = ctx.request.body
// 2.操作数据库
const res = await createUser(user_name, password)
// console.log(res)
// 3.返回结果
ctx.body = {
code: 0,
message: '用户注册成功',
result: {
id: res.id,
user_name: res.user_name
}
}
}

async login(ctx, next) {
ctx.body = '用户登录成功'
}
}

module.exports = new UserController()

再次使用apifox测试下register接口,注意要使用新的样例

image-20220727060131292

整个的流程小结:

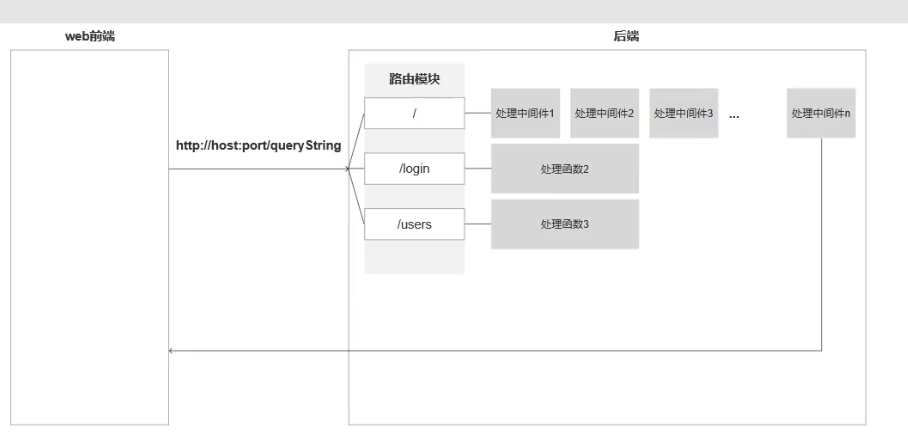
用户发送请求,koa服务接受到请求,先导入各种中间件,然后处理路由,根据路由调用处理函数(控制层),处理函数中涉及业务逻辑及数据库操作(服务层),服务层根据模型层,返回给控制层操作数据库的结果,控制层根据该结果封装接口数据,返回给路由,最后koa将路由的结果,作为接口响应发送到服务端

错误处理

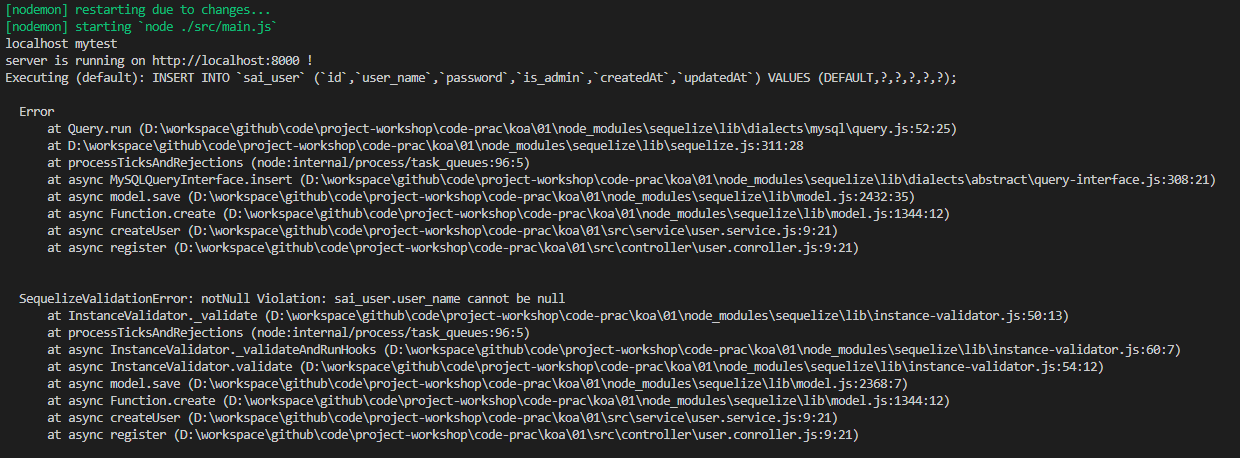
重复注册和没有用户名,目前都会返回500,错误类型不够细致

image-20220727061109390

后台是可以看到两次操作的错误提示的

image-20220727061249819

对于不同的错误类型,我们要分别处理

在控制层接受到用户参数时,要进行验证

  • 合法性验证

    user.controller.js

    1
    2
    3
    4
    5
    6
    7
    8
    9
    10
    11
    12
    13
    14
    15
    16
    17
    18
    19
    20
    21
    22
    23
    24
    25
    26
    27
    28
    29
    30
    31
    32
    33
    34
    35
    36
    37
    38
    const {createUser} = require('../service/user.service')

    class UserController{
    async register(ctx, next) {
    const {user_name, password} = ctx.request.body
    // 合法性验证
    if(!user_name || !password) {
    // 记录错误信息,后续可以记录到错误日志中
    console.error('用户名或密码为空')
    ctx.status = 400
    ctx.body = {
    code: '10001', // 自定义的,公司一般会有开发规范
    message: '用户名或者密码为空',
    result: ''
    }

    return // 合法性验证不通过的话,直接返回
    }

    // 验证通过后,再去操作数据库
    const res = await createUser(user_name, password)
    console.log(res)
    ctx.body = {
    code: 0,
    message: '用户注册成功',
    result: {
    id: res.id,
    user_name: res.user_name
    }
    }
    }

    async login(ctx, next) {
    ctx.body = '用户登录成功'
    }
    }

    module.exports = new UserController()

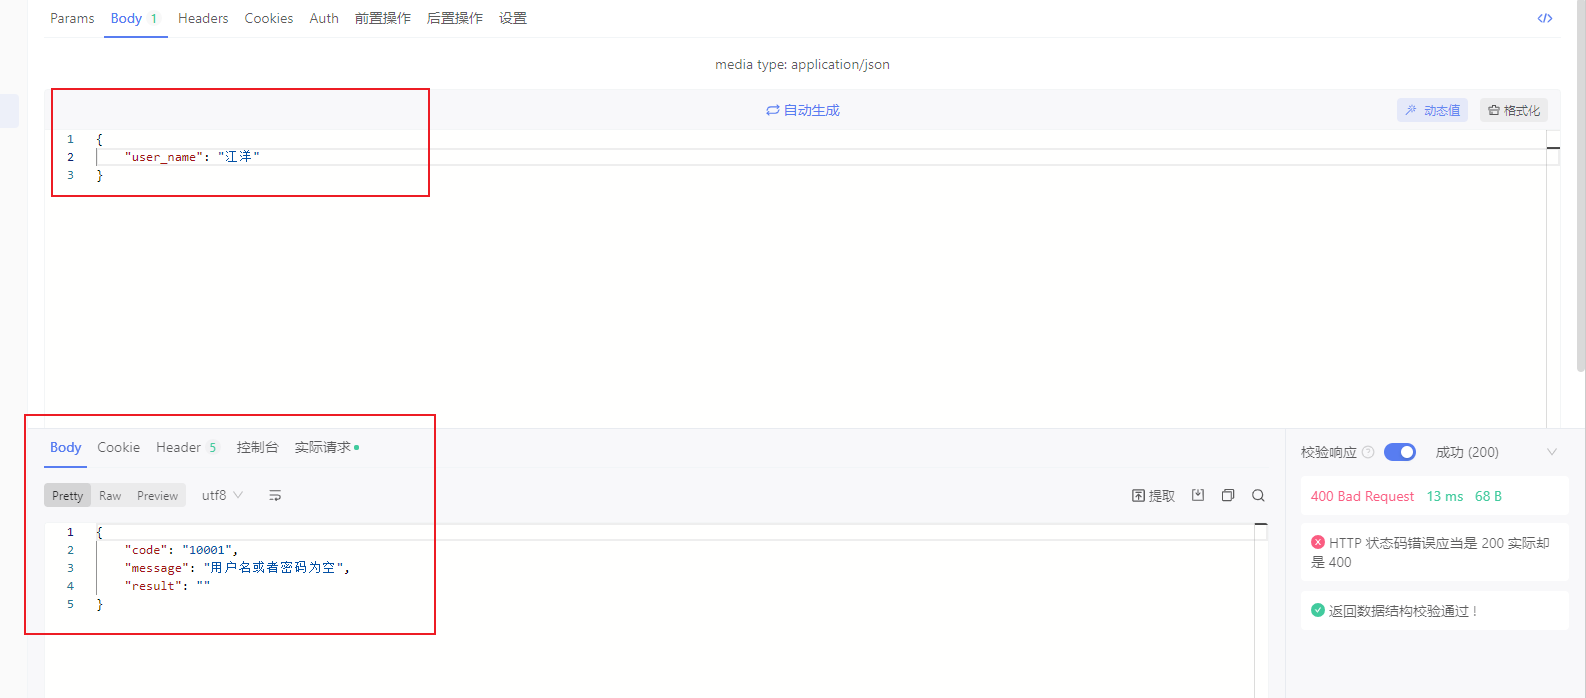
    参数只写一个字段,测试一下注册接口:
    image-20220727062331691

    可以看到后台,打印的错误日志

    image-20220727062455540

  • 合理性验证

    • controller层,需要根据传入的参数,查询数据库

      user.controller.js

      1
      2
      3
      4
      5
      6
      7
      8
      9
      10
      11
      12
      13
      14
      15
      16
      17
      18
      19
      20
      21
      22
      23
      24
      25
      26
      27
      28
      29
      30
      31
      32
      33
      34
      35
      36
      37
      38
      39
      40
      41
      42
      43
      44
      45
      46
      47
      48
      const {createUser, getUserInfo} = require('../service/user.service')

      class UserController{
      async register(ctx, next) {
      const {user_name, password} = ctx.request.body
      if(!user_name || !password) {
      console.error('用户名或密码为空')
      ctx.status = 400
      ctx.body = {
      code: '10001',
      message: '用户名或者密码为空',
      result: ''
      }

      return
      }

      // 合理性验证
      // 需要再次查询数据库 getUserInfo
      if(getUserInfo({user_name})) { // 根据用户名来查询,参数使用对象,这样可以让查询参数不受顺序影响
      ctx.status = 409 // 状态完成冲突,不熟悉的话,可以去MDN上看下常见状态码
      ctx.body = {
      code: '10002',
      message: '用户名已经存在',
      result: ''
      }
      return
      }


      const res = await createUser(user_name, password)
      console.log(res)
      ctx.body = {
      code: 0,
      message: '用户注册成功',
      result: {
      id: res.id,
      user_name: res.user_name
      }
      }
      }

      async login(ctx, next) {
      ctx.body = '用户登录成功'
      }
      }

      module.exports = new UserController()
    • service层中新增getUserInfo方法

      user.service.js

      1
      2
      3
      4
      5
      6
      7
      8
      9
      10
      11
      12
      13
      14
      15
      16
      17
      18
      19
      20
      21
      22
      23
      24
      25
      26
      27
      const User = require('../model/user.model')
      class UserService {

      async createUser(user_name, password) {
      const res = await User.create({ user_name, password })
      return res.dataValues
      }

      async getUserInfo({id, user_name, password, is_admin}) { // 参数设计成一个对象,因为查询用户,有可能根据id、user_name、password、is_admin字段去查询
      // 判断参数是否存在,拿到实参
      const whereOpt = {}
      id && Object.assign(whereOpt, {id})
      user_name && Object.assign(whereOpt, {user_name})
      password && Object.assign(whereOpt, {password})
      is_admin && Object.assign(whereOpt, {is_admin})

      // 调用ORM查询接口:findOne,这是一个异步函数
      const res = User.findOne({
      attributes: ['id', 'user_name', 'password', 'is_admin'],
      where: whereOpt
      })

      return res ? res.dataValues : null
      }
      }

      module.exports = new UserService()

      测试下接口返回值

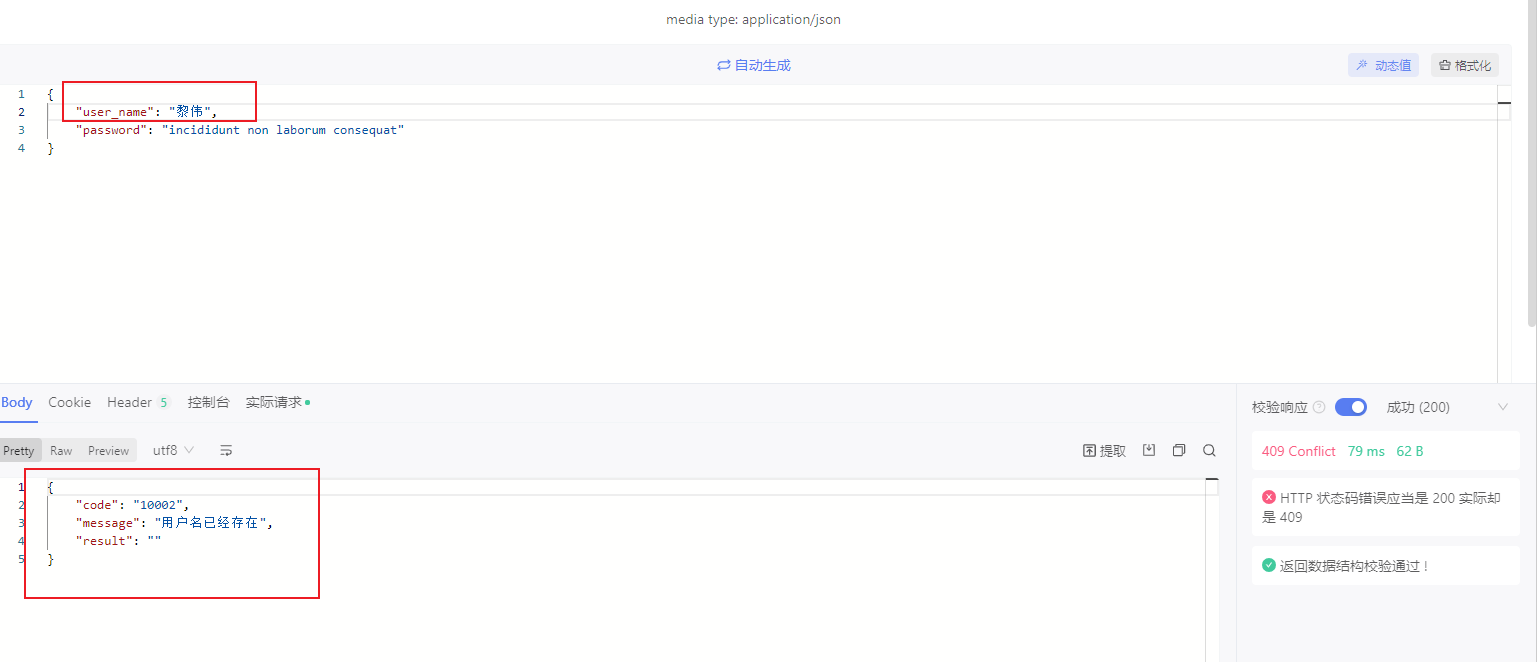
      选一个数据库中已经有的用户名进行测试

      image-20220727070845751

      后代打印的sql

      image-20220727070942651

错误处理函数封装

我们可以把格式的验证,单独封装成一个中间件(处理函数)

image-20220727071500267

controller层拆分中间件

新建middleware/user.middleware.js,中间件里定义各种函数,然后导出

user.middleware.js

controller里把合法性验证的代码抽离出来

1
2
3
4
5
6
7
8
9
10
11
12
13
14
15
16
17
18
19
20
21
22
23
const userValidator = async (ctx, next) => {
const { user_name, password } = ctx.request.body

if (!user_name || !password) {
console.error('用户名或密码为空', ctx.request.body)
ctx.status = 400
ctx.body = {
code: '10001',
message: '用户名或者密码为空',
result: ''
}

return // 校验没通过,直接返回
}

await next() // 校验通过了的话,就放行


}

module.exports = {
userValidator
}

那么什么时候执行中间件呢?

在路由匹配的时候,只要路由一匹配上,就立刻调用校验的中间件

user.route.js

1
2
3
4
5
6
7
8
9
10
11
const Router = require('@koa/router')
const router = new Router({ prefix: '/user' })
const { register, login } = require('../controller/user.conroller')
const { userValidator } = require('../middleware/user.middleware')
// 注册接口
router.post('/register', userValidator, register)
// 登录接口
router.post('/login', login)

module.exports = router

apifox测试一下,可以正常打印错误日志

再抽离查询用户的代码(合理性验证)

user.middleware.js

1
2
3
4
5
6
7
8
9
10
11
12
13
14
15
16
17
18
19
20
21
22
23
24
25
26
27
28
29
30
31
32
33
34
35
36
37
38
const { getUserInfo } = require('../service/user.service')

const userValidator = async (ctx, next) => {
const { user_name, password } = ctx.request.body

if (!user_name || !password) {
console.error('用户名或密码为空', ctx.request.body)
ctx.status = 400
ctx.body = {
code: '10001',
message: '用户名或者密码为空',
result: ''
}
return
}

await next()
}

const verifyUser = async (ctx, next) => {
const { user_name } = ctx.request.body
if (getUserInfo({ user_name })) {
ctx.status = 409
ctx.body = {
code: '10002',
message: '用户名已经存在',
result: ''
}
return
}

await next()
}

module.exports = {
userValidator,
verifyUser
}

user.route.js

1
2
3
4
5
6
7
8
9
10
11
const Router = require('@koa/router')
const router = new Router({ prefix: '/user' })
const { register, login } = require('../controller/user.conroller')
const { userValidator, verifyUser } = require('../middleware/user.middleware')

// 注册接口
router.post('/register', userValidator, verifyUser, register)
// 登录接口
router.post('/login', login)

module.exports = router

测试下用户名已存在的情况,正常

至此,逻辑已经很清晰了,但我们还可以进一步管理错误信息

统一错误管理

koa中,怎么进行错误管理呢?

  • 中间件里提交错误类型

通过ctx.app可以拿到实例化的koa对象,它有一个emit方法用来提交错误,我们可以对此做一个检测

ctx.app.emit('error', {}, ctx)

  • 该对象是自定义的错误类型,可以统一放在一个新的文件里管理

新建src/constant常量文件夹

新建error.type.js

1
2
3
4
5
6
7
8
9
10
11
12
13
// 定义错误类型
module.exports = {
userFormateError: {
code: '10001',
message: '用户名或者密码为空',
result: ''
},
userAlreadyExists: {
code: '10002',
message: '用户名已经存在',
result: ''
}
}

修改user.middle.js

1
2
3
4
5
6
7
8
9
10
11
12
13
14
15
16
17
18
19
20
21
22
23
24
25
26
27
28
29
30
31
32
33
const { getUserInfo } = require('../service/user.service')
const { userFormateError, userAlreadyExists } = require('../constant/error.type')

const userValidator = async (ctx, next) => {
const { user_name, password } = ctx.request.body

if (!user_name || !password) {
console.error('用户名或密码为空', ctx.request.body)
// ctx.status = 400
ctx.app.emit('error', userFormateError, ctx) // 该对象是自定义的错误类型,可以统一放在一个新的文件里管理
return
}

await next()

}

const verifyUser = async (ctx, next) => {
const { user_name } = ctx.request.body

if (getUserInfo({ user_name })) {
// ctx.status = 409
ctx.app.emit('error', userAlreadyExists, ctx)
return
}

await next()
}

module.exports = {
userValidator,
verifyUser
}

app/index.js中统一进行错误处理

1
2
3
4
5
6
7
8
9
10
11
12
13
14
15
16
17
18
19
20
21
22
const Koa = require('koa')
const Router = require('@koa/router')
const koaBody = require('koa-body')
const userRouter = require('../router/user.route')
const errHandler = require('./errorHandler')
const app = new Koa()

app.use(koaBody())
const indexRouter = new Router()
indexRouter.get('/', (ctx, next) => {
ctx.body = `Request Body: ${JSON.stringify(ctx.request.body)}`
})

app.use(indexRouter.routes())
app.use(userRouter.routes())


// 统一进行错误处理
// 发布订阅模式
app.on('error', errHandler)
module.exports = app

同级目录下,新建errHandler.js错误处理函数

errHandler.js

1
2
3
4
5
6
7
8
9
10
11
12
13
14
15
16
module.exports = (err, ctx) => {
let status = 500 // 默认错误状态码
switch (err.code) {
case '10001':
status = 400
break
case '10002':
status = 409
break
default:
status = 500
}

ctx.status = status
ctx.body = err
}

小问题

verifyUser中间件调用的getUserInfo返回的是一个Promise对象,恒为真,正常注册流程也走不下去了

user.middleware.js

1
2
3
4
5
6
7
8
9
10
11
const verifyUser = async (ctx, next) => {
const { user_name } = ctx.request.body

if (getUserInfo({ user_name })) {
ctx.app.emit('error', userAlreadyExists, ctx)
return
}

await next()
}

修改

  • 添加await,相当于判断条件是一个表达式

    1
    2
    3
    4
    5
    6
    7
    8
    9
    10
    11
    const verifyUser = async (ctx, next) => {
    const { user_name } = ctx.request.body

    if (await getUserInfo({ user_name })) {
    ctx.app.emit('error', userAlreadyExists, ctx)
    return
    }

    await next()
    }

另外假设中间件都没问题,到了控制层createUser这一步了,目前我们对这一步做任何的异常处理,使用try-catch来处理下

虽说这一步是sequelize自己操作的数据库,不大可能会出错,但为了代码的健壮性,还是要处理下的

user.controller.js

1
2
3
4
5
6
7
8
9
10
11
12
13
14
15
16
17
18
19
20
21
22
23
24
25
26
27
28
29
30
31
const { createUser } = require('../service/user.service')
const { userRegisterError } = require('../constant/error.type')
class UserController {
async register(ctx, next) {
const { user_name, password } = ctx.request.body

// 处理写入用户数据时,可能出现的异常
try {
const res = await createUser(user_name, password)
console.log(res)
ctx.body = {
code: 0,
message: '用户注册成功',
result: {
id: res.id,
user_name: res.user_name
}
}
} catch (err) {
console.log(err)
ctx.app.emit('error', userRegisterError, ctx)
return // 发生错误就不要继续往下执行了
}
}

async login(ctx, next) {
ctx.body = '用户登录成功'
}
}

module.exports = new UserController()

定义错误类型

constant/error.type.js

1
2
3
4
5
6
7
8
9
10
11
12
13
14
15
16
17
18
// 定义错误类型
module.exports = {
userFormateError: {
code: '10001',
message: '用户名或者密码为空',
result: ''
},
userAlreadyExists: {
code: '10002',
message: '用户名已经存在',
result: ''
},
userRegisterError: {
code: '10003',
message: '用户注册错误',
result: ''
}
}

我们在`createUser方法中,模拟下写入数据库时发生了错误

user.service.js

1
2
3
4
5
6
7
8
9
10
11
12
13
14
const User = require('../model/user.model')

class UserService {

async createUser(user_name, password) {
const res = await User.create({ user_name, password })
console.log(aa) // 打印不存在的变量,模拟数据库操作错误
return res.dataValues
}

// ...
}

module.exports = new UserService()

测试下

image-20220728194137316

后台日志

image-20220728194219755

建议调用service层所有的函数时,都加上错误处理

继续完善verifyUser

1
2
3
4
5
6
7
8
9
10
11
12
13
14
15
16
17
18
19
const verifyUser = async (ctx, next) => {
const { user_name } = ctx.request.body

try {
const res = await getUserInfo({ user_name })
if (res) {
console.error('用户名已存在', { user_name })
ctx.app.emit('error', userAlreadyExists, ctx)
return
}
} catch (err) {
console.err('获取用户信息错误', err)
ctx.app.emit('error', userQueryError, ctx)
return
}

await next()
}

error.type.js

1
2
3
4
5
6
7
8
9
10
11
12
13
14
15
16
17
18
19
20
21
22
23
// 定义错误类型
module.exports = {
userFormateError: {
code: '10001',
message: '用户名或者密码为空',
result: ''
},
userAlreadyExists: {
code: '10002',
message: '用户名已经存在',
result: ''
},
userRegisterError: {
code: '10003',
message: '用户注册错误',
result: ''
},
userQueryError: {
code: '10004',
message: '用户查询错误',
result: ''
}
}

可以看到,真正要写代码的部分,其实是比较少的

很重要的一部分,在于提高代码的质量上,都在一些异常捕获和错误处理上,这一块是需要下功夫的,平时写代码的时候,要有这样的意识

这样当代码上线后,如果有问题,我们调试错误会很方便

ctx.app.emit提交的错误,最后会以接口的形式返回给客户端,如果服务器自己想记录错误信息,可以使用console.error()来记录日志信息

目前来说,这里还是有一个问题,就是重复注册直接走到了register,验证重复用户名的中间件直接就通过了!!

原因是getUserInfo函数里的User.findOne是一个异步函数,需要加一个await,否则会出错

1
2
3
4
5
6
7
8
9
10
11
12
13
14
15
16
    async getUserInfo({id, user_name, password, is_admin}) {
const whereOpt = {}
id && Object.assign(whereOpt, {id})
user_name && Object.assign(whereOpt, {user_name})
password && Object.assign(whereOpt, {password})
is_admin && Object.assign(whereOpt, {is_admin})

// 调用ORM查询接口:findOne,这是一个异步函数
const res = await User.findOne({
attributes: ['id', 'user_name', 'password', 'is_admin'],
where: whereOpt
})

return res ? res.dataValues : null
}
}

这样重复注册走到verifyUser中间件时,就不会被当做异常处理

加密

在将密码保存到数据库之前,要对密码进行加密处理

md5加密还是有可能被破解的,使用bcrypt加密

第一个依赖也多,这里我们使用第二个bcryptjs:在 JavaScript 中优化了 bcrypt,零依赖关系。
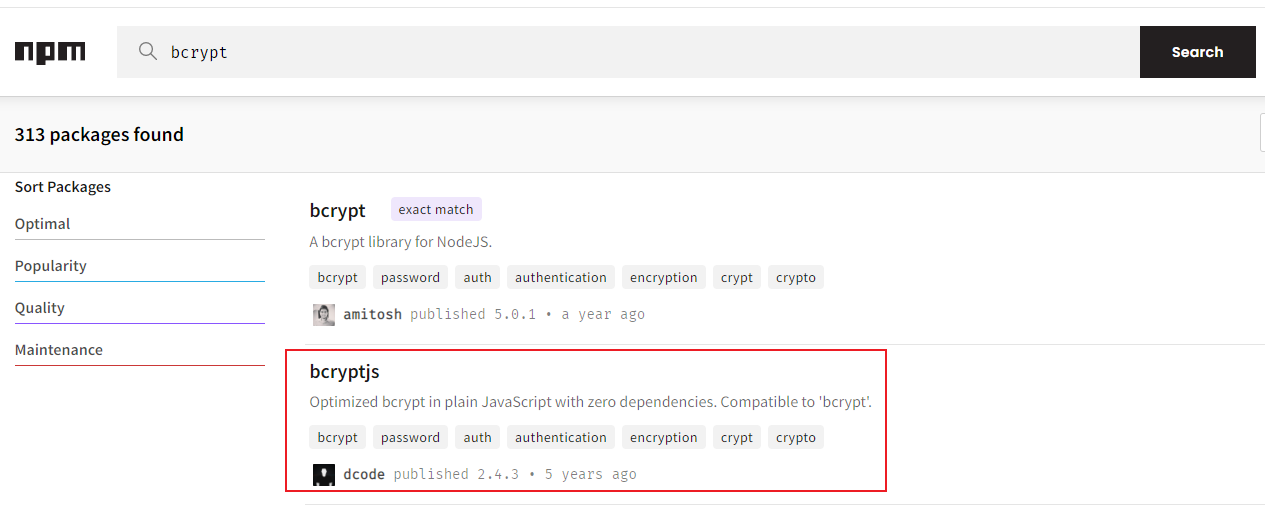
image-20220729054812130

安装

1
npm i bcryptjs

用法:有同步和异步的用法:https://www.npmjs.com/package/bcryptjs

使用:

  • 将代码加密功能,也抽离成一个中间件(单一职责原则)
    • 不想bcrypt这种加密方式,耦合到代码中
    • 后面有可能会换成其他加密方式:hashmd5

user.middleware.js

1
2
3
4
5
6
7
8
9
10
11
12
13
14
15
16
17
const bcrypt = require('bcryptjs')

// ...
const scyptPassword = async (ctx, next) => {
const { password } = ctx.request.body
const salt = bcrypt.genSaltSync(10); // 生成盐
const hash = bcrypt.hashSync(password, salt); // 根据盐生成hash,hash保存的是密文
ctx.request.body.password = hash // 使用hash覆盖password
await next()
}


module.exports = {
userValidator,
verifyUser,
scyptPassword
}

user.route.js导入并使用

测试注册接口成功后,查看userpassword字段,已加密

image-20220729060929127

仍存在的问题:密码在前端传给后端的过程中,是明文的,应该前端先加密,后端存储密文;而登录时,后面采用和前端一样的加密算法解密即可

小结:注册接口

梳理一下整理流程,及每个模块的功能

登录接口

user.controller.js

1
2
3
4
async login(ctx, next) {
const { user_name } = ctx.request.body
ctx.body = `欢迎回来,${user_name}`
}

完善apifox

image-20220729062050491

添加样例,应为数据库有已有的数据

image-20220729062118325

image-20220729062229643

但事实上,现在login对任何的输入都是可以的,我们需要对数据进行一个校验

  • 是否为空(合法性校验)

    • 复用
  • 是否存在(合理性校验)

    • 复用
  • 验证登录

    user.middleware.js

    1
    2
    3
    4
    5
    6
    7
    8
    9
    10
    11
    12
    13
    14
    15
    16
    17
    18
    19
    20
    21
    22
    23
    const verifyLogin = async (ctx, next) => {
    // 1.判断用户是否存在(不存在:报错)
    const { user_name, password } = ctx.request.body
    try {
    const res = await getUserInfo({ user_name })
    if (!res) {
    console.log('用户不存在', res)
    return ctx.app.emit('error', userNotFound, ctx)
    }
    // 2.找到了用户,比对密码是否匹配(不匹配:报错)
    if (!bcrypt.compareSync(password, res.password)) {
    return ctx.app.emit('error', userInvalidPassword, ctx)
    }
    } catch (err) {
    console.error(err)
    return ctx.app.emit('error', userLoginFailed, ctx) // getUserInfo出错,在不同场景下,抛出的错误应该是不同的
    }

    //通过
    await next()

    }

  • 登录成功后记录用户状态

    • 用户认证与授权

用户认证和授权

颁发token

登录成功后,给用户颁发一个令牌token,用户在以后的每一次请求中,携带这个令牌

前后端分离中,使用jwtjson web token

  • header:头部
  • payload:载荷
  • signature:签名

如何使用

  • 使用jsonwebtoken包:https://www.npmjs.com/package/jsonwebtoken

    • 安装:npm i jsonwebtoken
    • sign方法生成token
  • user.controller.js

    1
    2
    3
    4
    5
    6
    7
    8
    9
    10
    11
    12
    13
    14
    15
    16
    17
    18
    19
    20
    21
    22
    23
    24
    25
    26
    27
    28
    29
    30
    31
    32
    const jwt = require('jsonwebtoken')

    // ...

    class UserController {
    // ...

    async login(ctx, next) {
    const { user_name } = ctx.request.body
    // 获取用户信息(在paylaod中,记录id、user_name、is_admin)
    try {
    // 从返回结果中,过滤掉password,将剩下的属性,放在新的res对象中
    const { password, ...res } = await getUserInfo({ user_name })
    ctx.body = {
    code: 0,
    message: '用户登录成功',
    result: {
    /*
    * @params1:配置对象
    * @params2:秘钥
    * @params3:过期时间,一天
    */
    token: jwt.sign(res, JWT_SECRET, {expiresIn: '1d'})
    }
    }

    } catch (err) {
    console.error('用户登录失败', err)
    return
    }
    }
    }

    测试:

    image-20220730062107079

用户认证

我们新建一个修改密码的接口

image-20220730063834013

修改的操作

  • PUT:全量修改
  • PATCH:部分修改

写对应的路由

user.route.js

1
2
3
4
5
6
7
8
9
10
11
12
13
14
15
16
const Router = require('@koa/router')
const router = new Router({ prefix: '/user' })
const { register, login } = require('../controller/user.conroller')
const { userValidator, verifyUser, scyptPassword, verifyLogin } = require('../middleware/user.middleware')

// 注册接口
router.post('/register', userValidator, verifyUser, scyptPassword, register)
// 登录接口
router.post('/login', userValidator, verifyLogin, login)
// 修改密码接口
router.patch('/modifyPassword', (ctx, next) => {
ctx.body = '修改密码成功'
})

module.exports = router

先简单测试下

我们在上面颁发token后,后续的请求(如修改密码)需要携带这个token

请求头新增Authorization,值一开始固定的是Bearer ,有一个空格

image-20220730082130815

后面发送请求时,需要加上签发的token

新建auth.middleware.js文件,将认证相关的验证放在这里面

1
2
3
4
5
6
7
8
9
10
11
12
13
14
15
16
17
18
19
20
21
22
23
24
25
26
27
28
29
30
31
32
33
34
35
36
37
const jwt = require('jsonwebtoken')
const { JWT_SECRET } = require('../config/config.default')
const { tokenExpiredError, invalidToken} = require('../constant/error.type')
const auth = async (ctx, next) => {
// 获取请求头的token
const { authorization } = ctx.request.header
const token = authorization.replace('Bearer ','') // 这里要有一个空格
// 根据自定义私钥,使用jwt验证token
console.log('token', token)
try {
// user中包含了payload的信息:user_name, id, is_admin
const user = jwt.verify(token, JWT_SECRET) // 如果jwt.verify验证失败,会抛出一个异常
// console.log('user', user)
ctx.state.user = user
} catch (err) {
// console.log('err name', err.name)
// jwt.verify异常情况有多种,可参照Npm文档 https://www.npmjs.com/package/jsonwebtoken
switch (err.name) {
case 'TokenExpiredError': // jwt返回的错误类型
console.error('token已过期', err)
ctx.app.emit('error', tokenExpiredError, ctx)
return
case 'JsonWebTokenError':
console.error('无效的token', err)
return ctx.app.emit('error', invalidToken, ctx)
default:
console.error('token错误', err)
return
}
}

await next()
}

module.exports = {
auth
}

error.type.js

1
2
3
4
5
6
7
8
9
10
11
12
13
14
15
16
// 定义错误类型
// 100 用户模块
// 101 授权模块
module.exports = {
// ...
tokenExpiredError: {
code: '10101',
message: 'token已过期',
result: ''
},
invalidToken: {
code: '10102',
message: '无效的token',
result: ''
}
}

在路由上,加上token认证的中间件

user.route.js

1
2
3
4
5
6
7
8
9
10
11
12
13
14
15
16
const Router = require('@koa/router')
const router = new Router({ prefix: '/user' })
const { register, login } = require('../controller/user.conroller')
const { userValidator, verifyUser, scyptPassword, verifyLogin } = require('../middleware/user.middleware')
const { auth } = require('../middleware/auth.middleware')
// 注册接口
router.post('/register', userValidator, verifyUser, scyptPassword, register)
// 登录接口
router.post('/login', userValidator, verifyLogin, login)
// 修改密码接口
router.patch('/modifyPassword', auth, (ctx, next) => { // 加上认证的中间件
ctx.body = '修改密码成功'
})

module.exports = router

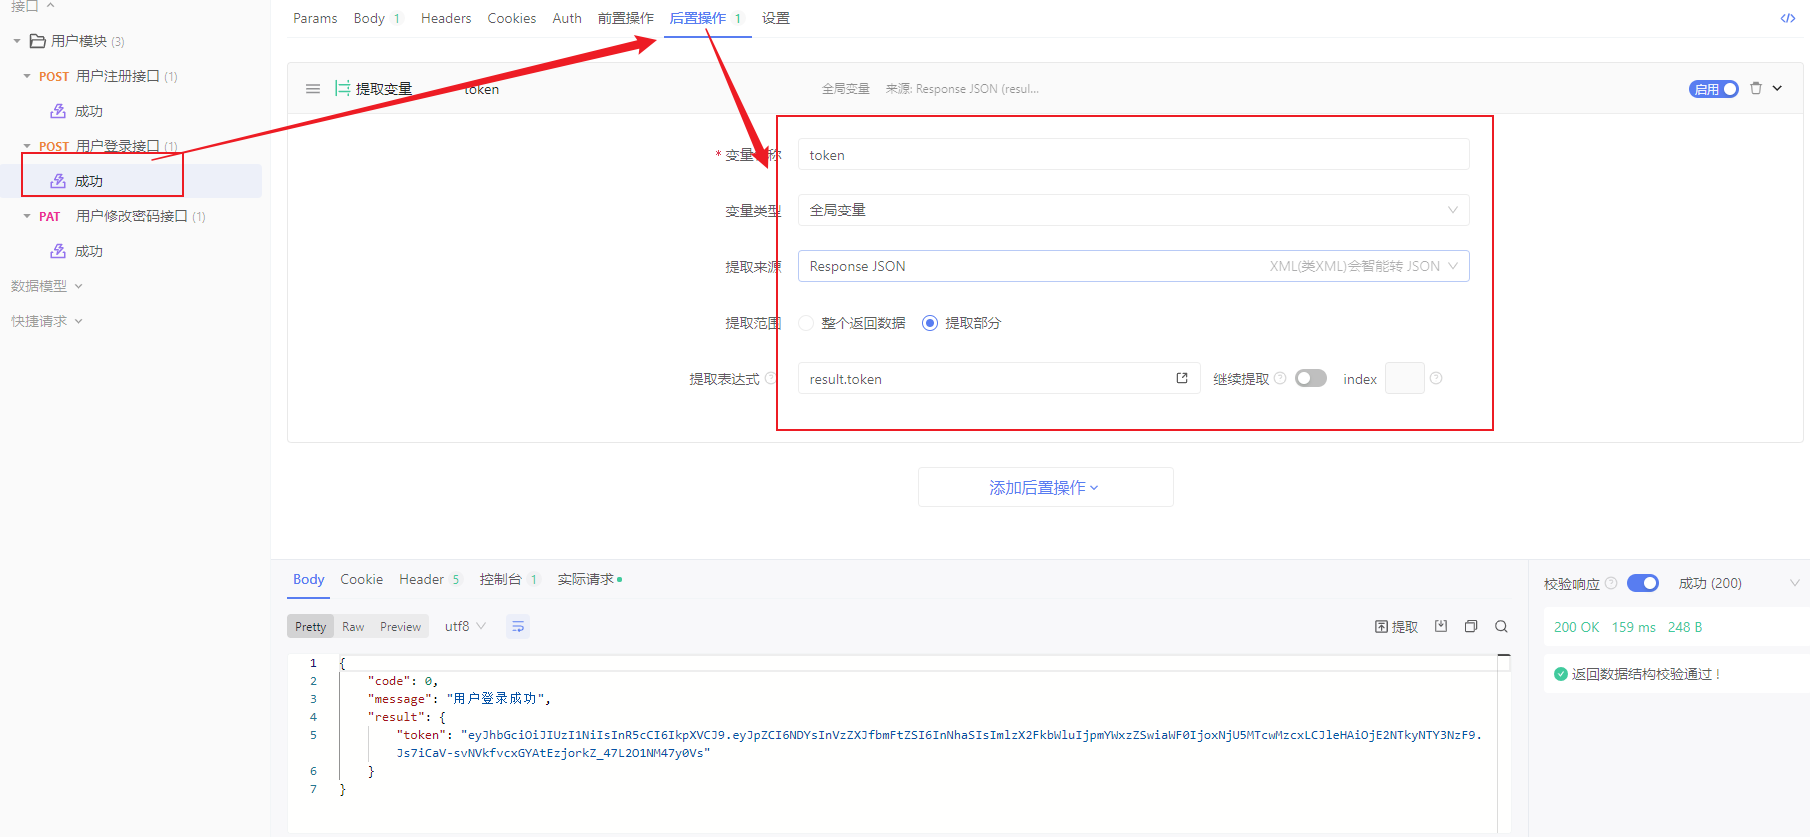
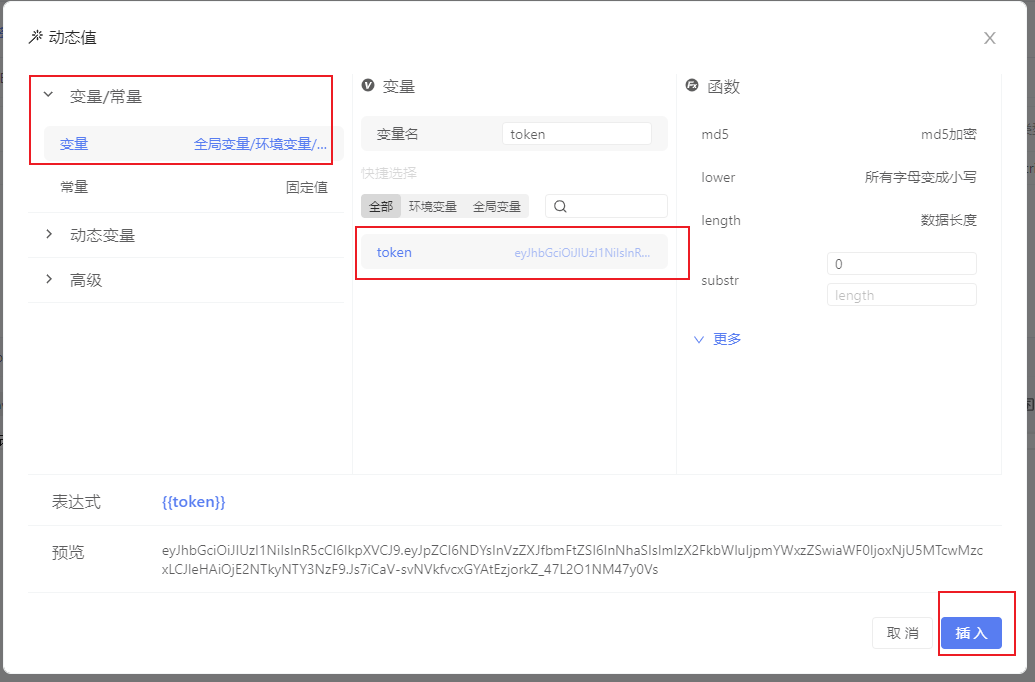
接口测试工具中,将登录成功后颁发的token,存为全局变量

image-20220730172723345这样在修改密码的接口里,就可以不用复制token

image-20220730172826331

image-20220730172900867

但这里有个不好的地方,我想测试下错误token的响应,是不支持修改的,测试的时候还是需要手动复制

正常接口返回的user

1
2
3
4
5
6
7
8
user {
id: 46,
user_name: 'sai',
is_admin: false,
iat: 1659173449,
exp: 1659259849
}

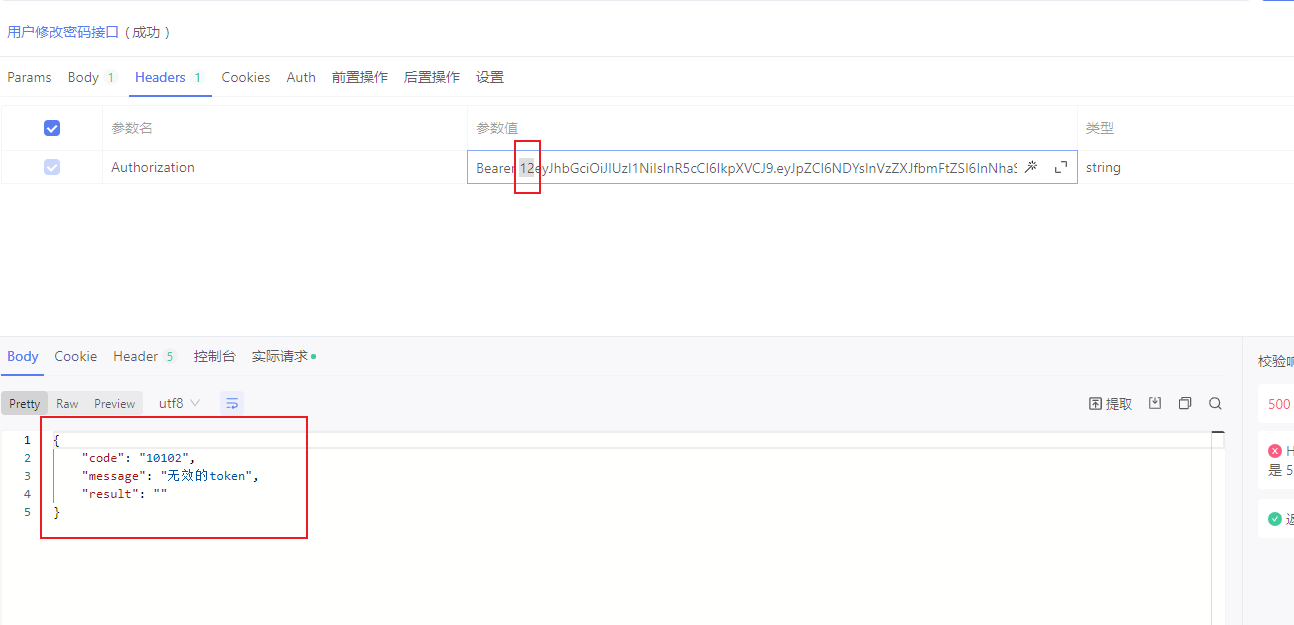
测试无效的token

image-20220730173957547

token失效时间改为5s,测试过期token(记得测试完改回去)

重新登录后,测试下

image-20220730174247201

修改密码

测试没问题后,我们再加上加密的中间件,并正式写修改密码接口对应的处理函数

user.route.js

1
2
// 修改密码接口
router.patch('/modifyPassword', auth, scyptPassword, modifyPassword)

user.controller.js

1
2
3
4
5
6
7
8
9
10
11
12
13
14
15
16
17
18
19
20
const { createUser, getUserInfo, updateById } = require('../service/user.service')

// ...

async modifyPassword(ctx, next) {

// 1. 获取数据
const id = ctx.state.user.id
const password = ctx.request.body.password
// 2. 操作数据库
try {
const res = await updateById({ id, password })
} catch (err) {
console.error(err)
}
// 3. 返回结果
ctx.body = '修改密码成功'

console.log(id, password)
}

user.service.js

1
2
3
4
5
6
7
8
9
10
11
12
13
14
15
async updateById({ id, user_name, password, is_admin }) { // 接口的设计要考虑到复用性,不要这次只是根据id修改密码,就只写这一个功能
const whereOpt = { id }
const newUser = {}
user_name && Object.assign(newUser, { user_name })
password && Object.assign(newUser, { password })
is_admin && Object.assign(newUser, { is_admin })

const res = await User.update(newUser, {
where: whereOpt
})

// console.log('res', res, typeof res) // 返回是一个数组
return res[0] > 0 ? true : false

}

小问题:入参为空对象时,应该做处理;修改密码还是原密码时,应该做处理

商品模块

整体流程打通

路由

新建router/goods.route.js

1
2
3
4
5
6
7
8
9
const Router = require('@koa/router')
const router = new Router({ prefix: '/goods' })

const { upload } = require('../controller/goods.controller')


router.post('/upload', upload)

module.exports = router

控制器

新建controller/goods/controller.js

1
2
3
4
5
6
7
8
class GoodsController {
// 根据实际业务,可以写的很复杂,比如支持word、excel、图片等资源上传
async upload(ctx, next) {
ctx.body = '商品上传成功'
}
}

module.exports = new GoodsController()

app/index.js

1
2
3
4
5
6
7
8
9
10
11
12
13
14
15
16
17
18
const Koa = require('koa')
const Router = require('@koa/router')
const koaBody = require('koa-body')
const userRouter = require('../router/user.route')
const goodsRouter = require('../router/goods.route')
const errHandler = require('./errHandler')
const app = new Koa()

app.use(koaBody())
app.use(userRouter.routes())
app.use(goodsRouter.routes())


// 统一进行错误处理
// 发布订阅模式
app.on('error', errHandler)
module.exports = app

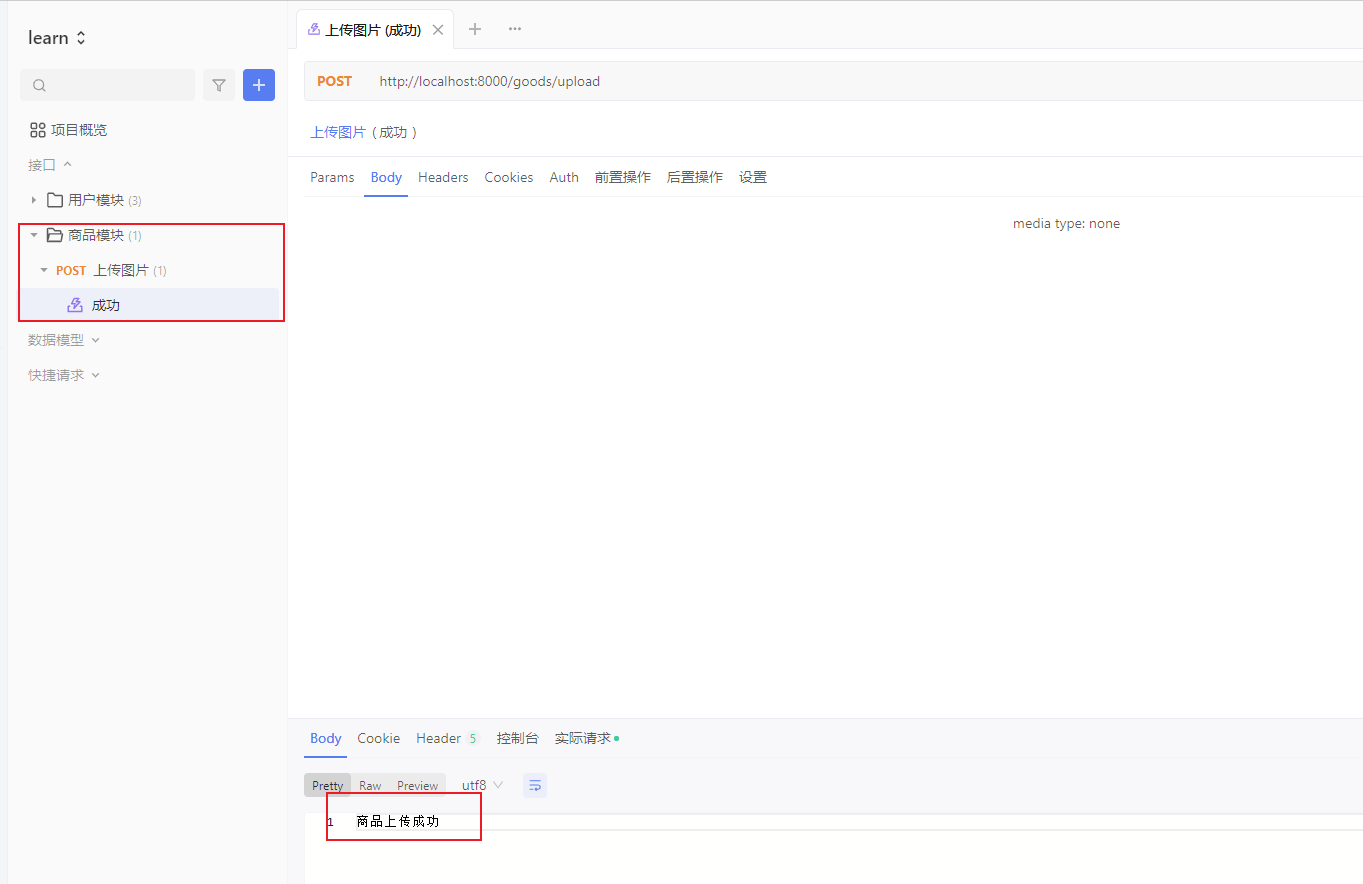
测试接口

image-20220730191605224

至此,整个流程已经打通

自动加载路由

上面我们在app/index.js注册路由时,需要手动一个个导入

可以使用fs模块实现自动导入

新建router/index.js

1
2
3
4
5
6
7
8
9
10
11
12
13
const fs = require('fs')
const Router = require('@koa/router')
const router = new Router()

fs.readdirSync(__dirname).forEach(file => { // readdirSync方法,以同步的方式获取文件名
// console.log(file) // 当前目录下的所有文件名
if (file !== 'index.js') { // 过滤掉自身
let r = require('./' + file) // 加载文件
router.use(r.routes())
}
})

module.exports = router

改写app/index.js

1
2
3
4
5
6
7
8
9
10
11
12
13
14
15
const Koa = require('koa')
const koaBody = require('koa-body')
const router = require('../router') // 默认会找index.js
const errHandler = require('./errHandler')
const app = new Koa()

// use方法返回app自身
app
.use(koaBody())
.use(router.routes())
.use(router.allowedMethods()) // 请求类型不支持的话,会更友好的响应
.on('error', errHandler)

module.exports = app

use(router.allowedMethods()) ,请求类型不支持的话,会更友好的响应

image-20220730193114786