[TOC]

Centos7下Apache安装Brat标注工具

一、Brat简介

BRAT是一个基于web的文本标注工具,主要用于对文本的结构化标注,用BRAT生成的标注结果能够把无结构化的原始文本结构化,供计算机处理。利用该工具可以标注实体,事件、关系、属性等,只支持在linux下安装,其使用需要webserver,官方给出的教程使用的是Apache2。

so,安装Brat之前需要先安装Apache。
如果你使用的windows系统,那么在这之前你需要先安装一个linux系统的虚拟机,我安装的虚拟机是Centos7系统的。

二、 配置Apache

1.安装Apache

Centos7下Apache的安装包叫httpd,执行以下命令进行安装:

1
yum install httpd -y

2.修改主配置文件httpd.conf

1
vim /etc/httpd/conf/httpd.conf

添加如下内容:

1
2
3
4
5
6
7
8
9
10
<Directory /var/www/html/brat>
AllowOverride Options Indexes FileInfo Limit
Require all granted
AddType application/xhtml+xml .xhtml
AddType font/ttf .ttf
# For CGI support
AddHandler cgi-script .cgi
# Comment out the line above and uncomment the line below for FastCGI
AddHandler fastcgi-script fcgi
</Directory>

/var/www/html/brat路径是与后面要安装brat的路径对应!

3.配置userdir模块

使用以下命令:

1
vim /etc/httpd/conf.d/userdir.conf

找到文件中代码:

1
2
3
4
5
6
7
8
9
10
11
12
13
14
15
<IfModule mod_userdir.c>
#
# UserDir is disabled by default since it can confirm the presence
# of a username on the system (depending on home directory
# permissions).
#
UserDir disabled

#
# To enable requests to /~user/ to serve the user's public_html
# directory, remove the "UserDir disabled" line above, and uncomment
# the following line instead:
#
#UserDir public_html
</IfModule>

修改为:

1
2
3
4
5
6
7
8
9
10
11
12
13
14
15
16
<IfModule mod_userdir.c>
#
# UserDir is disabled by default since it can confirm the presence
# of a username on the system (depending on home directory
# permissions).
#
#UserDir disabled

#
# To enable requests to /~user/ to serve the user's public_html
# directory, remove the "UserDir disabled" line above, and uncomment
# the following line instead:
#
#UserDir public_html
UserDir brat
</IfModule>

4.开启Apache服务

1
systemctl start httpd

a.设置开机自启Apache服务

1
systemctl enable httpd

b.顺便记录一下Apache命令大全

后面每次更改配置文件后,都需要重启apache服务

1
2
3
4
5
6
7
8
#重新启动Apache
systemctl restart httpd
#停止Apache
systemctl stop httpd
#查看Apache状态
systemctl status httpd
#设置开机不启动Apache
systemctl disable httpd

5.测试Apache

Apache的存放路径:/var/www/html
进入apache网页的存放路径,进行网页测试:

1
cd var/www/html

新建一个测试网页:

1
vim index.html

在文件中添加以下内容:

1
2
3
4
5
<html>
<body>
<p>Hello World</p>
</body>
</html>

保存后退出,在浏览器能看到Hello World界面,表示Apache配置成功!

三、安装Brat

1.下载Brat

安装v1.3p1版本,下载地址:
https://github.com/nlplab/brat/archive/v1.3_Crunchy_Frog.tar.gz
别用wget直接下载,wget下载下来的压缩包不完整,有错误。老老实实下载下来,传到linux系统中吧。
下载的压缩文件放在Apache文件夹中:/var/www/html/

2.解压文件

1
tar -xzvf v1.3_Crunchy_Frog.tar.gz

3.文件夹重命名

重命名一个文件夹,上面配置Apache的时候已经配置到了brat文件夹下了,所以改名为brat:

1
mv brat-1.3_Crunchy_Frog brat

4.对brat目录授权

1
sudo chmod 777 -R /var/www/html/brat

5.安装Brat

a.进入brat

1
cd brat

b.执行命令进行brat安装

中途需要根据提示输入用户名、密码、管理员邮箱

1
sh install.sh

出现以下提示,即安装成功:

1
2
3
4
5
6
7
8
9
10
11
12
13
14
15
16
17
18
19
20
21
22
23
24
25
26
27
28
29
30
31
32
33
34
35
Assigning owner of the following directories to apache (apache):
"/var/www/html/brat/work/"
and
"/var/www/html/brat/data/"
(this requires sudo; please enter your password if prompted)
The installation has finished, you are almost done.

1.) If you are installing brat on a webserver, make sure you have
followed the steps described in the brat manual to enable CGI:

http://brat.nlplab.org/installation.html

2.) Please verify that brat is running by accessing your installation
using a web browser.

You can automatically diagnose some common installation issues using:

tools/troubleshooting.sh URL_TO_BRAT_INSTALLATION

If there are issues not detected by the above script, please contact the
brat developers and/or file a bug to the brat bug tracker:

https://github.com/nlplab/brat/issues

3.) Once brat is running, put your data in the data directory. Or use
the example data placed there by the installation:

/var/www/html/brat/data

4.) You can find configuration files to place in your data directory in
the configurations directory, see the manual for further details:

/var/www/html/brat/configurations

5.) Then, you (and your team?) are ready to start annotating!

6. 安装完成后,更改data和work目录的用户组和权限

1
2
chgrp -R apache data work
chmod -R g+rwx data work

至此,就可以在浏览器进行测试一下了,默认的url是IP/brat/,example:127.0.0.1/brat/。

7.添加用户

实现标注时,可以多个用户登录进行标注。
编辑文档:

1
vim /var/www/html/brat/config.py 

修改对应的行,增加用户名和密码:

1
2
3
4
5
USER_PASSWORD = {
'admn': 'admin',
'test': 'test',
# (add USERNAME:PASSWORD pairs below this line.)
}

8.设置支持中文

编辑配置文件:

1
vim /var/www/html/brat/server/src/projectconfig.py

找到n = re.sub(r’[^a-zA-Z0-9_-]’, ‘’, n)这一行,大概在162行,修改为:
re.sub(u’[^a-zA-Z\u4e00-\u9fa5<>,0-9
-]’, ‘_’, n)
如下:

1
2
3
4
5
6
7
8
9
10
11
12
13
14
15
16
17
18
19
20
21
22
23
24
25
def normalize_to_storage_form(t):
"""
Given a label, returns a form of the term that can be used for
disk storage. For example, space can be replaced with underscores
to allow use with space-separated formats.
"""
if t not in normalize_to_storage_form.__cache:
# conservative implementation: replace any space with
# underscore, replace unicode accented characters with
# non-accented equivalents, remove others, and finally replace
# all characters not in [a-zA-Z0-9_-] with underscores.

import re
import unicodedata

n = t.replace(" ", "_")
if isinstance(n, unicode):
ascii = unicodedata.normalize('NFKD', n).encode('ascii', 'ignore')
#n = re.sub(r'[^a-zA-Z0-9_-]', '_', n)
n = re.sub(u'[^a-zA-Z\u4e00-\u9fa5<>,0-9_-]', '_', n)

normalize_to_storage_form.__cache[t] = n

return normalize_to_storage_form.__cache[t]
normalize_to_storage_form.__cache = {}

注意,修改的时候加tab键,不要敲空格

用下面的正则规则:

1
n = re.sub(u'[^a-zA-Z\u4e00-\u9fa5< >\u2014-\uff1b< >\x00-\xff< >,0-9_-]', '_', n)

四、标注工具使用示例

现在就可以真正的使用Brat进行标注了。

1.新建项目文件夹并进入此文件夹

首先进入brat文件夹的data目录中新建project文件夹:

1
2
3
cd /var/www/html/brat/data
mkdir project
cd project

2.设置项目目录权限

1
2
3
sudo chmod 777 -R /var/www/html/brat/data/project/

sudo chmod 777 -R ./

3.新建文件

新建一个配置文件annotation.conf

1
vim annotation.conf

在文件中插入以下内容:

1
2
3
4
5
6
7
8
9
10
11
12
13
[entities]
# Definition of entities.
#Format is a simple list with one type per line.
时间
地点
人名
组织名
公司名
产品名
[attributes]
Category Arg:Disease, Value:SpecificDisease|Modifier|DiseaseClass|CompositeMention
[relations]
[events]

再新建一个配置文件visual.conf,以配置不同的类别用不同的颜色显示。

1
vim visual.conf

在文件中插入以下内容:

1
2
3
4
5
6
7
8
9
10
11
12
13
14
15
[labels]
时间 | 时间
地点 | 地点
人名 | 人名
组织名 | 组织名
公司名 | 公司名
产品名 | 产品名
[drawing]
时间 bgColor:yellow
地点 bgColor:blue, fgColor:white
人名 bgColor:deepskyblue
组织名 bgColor:green, fgColor:white
公司名 bgColor:purple, fgColor:white
产品名 bgColor:pink
Category glyph:[spec]|[mod]|[cls]|[comp]

新建一个配置文件visual.conf,以配置不同的类别用不同的颜色显示。

接下来,新建一个待标注的文本文件example.txt:

1
vim example.txt

新建一个kb_shortcuts.conf,以配置快捷键

1
2
3
4
5
6
7
# -*- Mode: Text; tab-width: 2; indent-tabs-mode: nil; coding: utf-8; -*-
# vim:set ft=conf ts=2 sw=2 sts=2 autoindent:

# Keyboard shortcuts for quick type selection in annotation.

A 机构名
S 产品名

在文件中放入你想标注的文字,标注文本建议控制在500字符内:

1
今年海钓比赛在厦门市与金门之间的海域举行。

新建一个标注的空文件example.ann,对example.txt标注的结果存储在example.ann中。

1
vim example.ann

4.开始标注

在浏览器输入:http://127.0.0.1/brat/
首先登录,例如登录我们添加的test用户

打开example.ann可以看到文件中新增了标注的内容:

1
2
T1      地点 7 10       厦门市
T2 地点 11 13 金门

到此就标注完成了。
若要进行NER命名实体识别等模型训练时,再写个程序把ann文件转化为BIO标注的文件即可。

五、错误处理

1.安装Brat出现以下错误

进入界面后,右上角登录admin/admin,最下方报错:

1
2
3
Error: ActiongetCollectionInformation failed on error Internal Server Error
Error: Actionwhoami failed on error Internal Server Error
Error: ActionloadConf failed on error Internal Server Error

2.出现此错误的原因

出现以上问题的原因是由于SELinux的权限的限制。
安全增强型 Linux(Security-Enhanced Linux)简称 SELinux,它是一个 Linux 内核模块,也是 Linux 的一个安全子系统。
brat将可执行脚本(CGI脚本)、静态文件以及注释的数据都保存在同一个目录中,即brat目录中。SELinux的html目录默认配置为防止从非CGI目录执行CGI脚本。所以,只更改Apache配置是不够的,还需要设置brat目录中相应配置文件的权限。
参看以下方法解决即可。

3.解决方法:

1.进入brat文件夹:

1
cd /var/www/html/brat

2.对文件和目录进行授权:

1
2
3
4
5
chcon -h system_u:object_r:httpd_sys_content_t:s0 .

chcon -t httpd_sys_content_t .
chcon -t httpd_sys_script_exec_t *.cgi
sudo chcon -R -t httpd_sys_script_rw_t work data

第一个命令对brat目录下的所有文件进行读操作授权
第二个命令对brat目录下的CGI脚本进行运行操作授权
第三个命令对brat目录下work和data目录进行读写操作授权

4.本地启动

如果仍报错,那放弃web服务的方式启动

进入brat目录,以本地运行

1
python2 standalone.py

然后根据提示的端口,访问:ip:port/index.xhtml

5.前端标注页面,报文件夹没有权限

即使已经授权了,还是会有权限错误的提示,可以在后台新建一个标注文件夹,重新赋予权限

但是要注意不同任务之间的区分

六、常见配置项

快捷键

批量生成ann

https://www.uoften.com/article/140945.html

Linux xargs 命令解析

  • xargs

    在txt对应的目录下

    1
    find ./ -name "*.txt" | awk -F "." '{print $2}' | xargs -i -t touch ./{}.ann
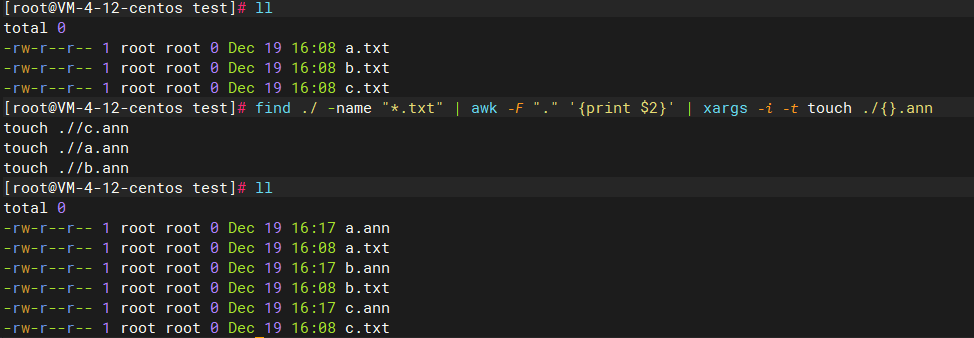
    image-20221219161724311

    如果文件名有多个点,需要适当的改动下

    1
    find ./ -name "*.txt" | awk -F ".txt" '{print $1}'| xargs -i -t touch ./{}.ann

查阅修改时间

ann标注结果会出现换行情况

先找到不是以T开头的

https://www.codenong.com/26804586/

1
grep -P '^(?!T)' 1.ann

删除指定行,https://m.qy.cn/jszx/detail/27918.html

1
sed -i '/System\|Linux/d' sed-demo.txt
1
2
3
4
5
6
常用选项(options):
-n∶使用安静(silent)模式。默认sed会输出读取文档的全部内容。但如果加上 -n 参数后,则只有经过sed特殊处理的那一行(或者动作)才会被列出来。
-e∶多点编辑 让一条sed可以执行多条指令
-f∶直接将 sed 的动作写在一个脚本文件内, -f filename 则可以执行 filename 内的sed动作;
-r∶让sed支持扩展正则 若与其它选项一起使用,应放作为首选项
-i∶直接修改读取的档案内容,而不是由屏幕输出。

替换字符串,https://blog.csdn.net/ab0902cd/article/details/126833936

1
2
3
4
1. 替换指定文件的字符串

sed -i "s/oldstring/newstring/g" filename
sed -i "s/6/sk/g" ./test01.txt